Linux/Docker项目部署
Linux项目部署
一、安装JDK
1、上传安装包
jdk的二进制发布包上传到Linux
[root@localhost ~]# ll
总用量 178220
-rw-r--r-- 1 root root 182487685 4月 23 12:04 jdk-17.0.10_linux-x64_bin.tar.gz
[root@localhost ~]#
2、解压安装包
[root@localhost ~]# tar -zxvf jdk-17.0.10_linux-x64_bin.tar.gz -C /usr/local/
jdk-17.0.10/man/man1/klist.1
jdk-17.0.10/man/man1/ktab.1
jdk-17.0.10/man/man1/rmiregistry.1
jdk-17.0.10/man/man1/serialver.1
jdk-17.0.10/release
[root@localhost ~]# 3、配置环境变量
[root@localhost jdk-17.0.10]# vim /etc/profile
#新增环境变量
export JAVA_HOME=/usr/local/jdk-17.0.10
export PATH=$JAVA_HOME/bin:$PATH
"/etc/profile" 83L, 1964C 已写入
[root@localhost jdk-17.0.10]#
#加载环境变量
[root@localhost ~]# source /etc/profile
[root@localhost ~]# java -version
java version "17.0.10" 2024-01-16 LTS
Java(TM) SE Runtime Environment (build 17.0.10+11-LTS-240)
Java HotSpot(TM) 64-Bit Server VM (build 17.0.10+11-LTS-240, mixed mode, sharing)
[root@localhost ~]#二、安装MySQL
1、准备工作
rpm -qa查询当前系统中安装的所有软件rpm -qa | grep mysql查询当前系统中安装的名称带mysql的软件rpm -qa | grep mariadb查询当前系统中安装的名称带mariadb的软件
[root@localhost ~]# rpm -qa | grep mysql
[root@localhost ~]# rpm -qa | grep mariadb
mariadb-libs-5.5.68-1.el7.x86_64
#对查询的结果进行删除
[root@localhost ~]# rpm -e --nodeps mariadb-libs-5.5.68-1.el7.x86_64
[root@localhost ~]# rpm -qa | grep mariadb
[root@localhost ~]#
2、上传并解压
[root@localhost ~]# ll
总用量 763572
-rw-r--r-- 1 root root 182487685 4月 23 12:04 jdk-17.0.10_linux-x64_bin.tar.gz
-rw-r--r-- 1 root root 599400444 4月 23 12:05 mysql-8.0.30-linux-glibc2.12-x86_64.tar.xz
[root@localhost ~]# tar -xvf mysql-8.0.30-linux-glibc2.12-x86_64.tar.xz
mysql-8.0.30-linux-glibc2.12-x86_64/bin/
mysql-8.0.30-linux-glibc2.12-x86_64/bin/myisam_ftdump
mysql-8.0.30-linux-glibc2.12-x86_64/bin/myisamchk
mysql-8.0.30-linux-glibc2.12-x86_64/bin/myisamlog
mysql-8.0.30-linux-glibc2.12-x86_64/bin/mysqldump
……
[root@localhost ~]#
#移动到目录
[root@localhost ~]# mv mysql-8.0.30-linux-glibc2.12-x86_64 /usr/local/mysql
[root@localhost ~]# ll /usr/local/mysql/
总用量 296
drwxr-xr-x 2 7161 31415 4096 7月 7 2022 bin
drwxr-xr-x 2 7161 31415 55 7月 7 2022 docs
drwxr-xr-x 3 7161 31415 282 7月 7 2022 include
drwxr-xr-x 6 7161 31415 201 7月 7 2022 lib
-rw-r--r-- 1 7161 31415 287624 7月 7 2022 LICENSE
drwxr-xr-x 4 7161 31415 30 7月 7 2022 man
-rw-r--r-- 1 7161 31415 666 7月 7 2022 README
drwxr-xr-x 28 7161 31415 4096 7月 7 2022 share
drwxr-xr-x 2 7161 31415 77 7月 7 2022 support-files
[root@localhost ~]#3、配置环境变量
[root@localhost ~]# vim /etc/profile
#新增MySQL环境变量
export MYSQL_HOME=/usr/local/mysql
export PATH=$MYSQL_HOME/bin:$PATH
export JAVA_HOME=/usr/local/jdk-17.0.10
export PATH=$JAVA_HOME/bin:$PATH
"/etc/profile" 83L, 1964C 已写入
[root@localhost ~]# source /etc/profile
[root@localhost ~]#
#注册MySQL为系统服务:
[root@localhost ~]# cp /usr/local/mysql/support-files/mysql.server /etc/init.d/mysql
[root@localhost ~]# chkconfig --add mysql
[root@localhost ~]# 4、初始化数据库
#创建一个用户组, 组名就叫mysql
[root@localhost ~]# groupadd mysql
#创建一个系统用户 mysql, 并归属于用户组 mysql
[root@localhost ~]# useradd -r -g mysql -s /bin/false mysql
#初始化mysql
[root@localhost ~]# mysqld --initialize --user=mysql --basedir=/usr/local/mysql --datadir=/usr/local/mysql/data
2025-04-23T05:19:48.856690Z 0 [System] [MY-013169] [Server] /usr/local/mysql/bin/mysqld (mysqld 8.0.30) initializing of server in progress as process 3062
2025-04-23T05:19:48.876329Z 1 [System] [MY-013576] [InnoDB] InnoDB initialization has started.
2025-04-23T05:19:49.848448Z 1 [System] [MY-013577] [InnoDB] InnoDB initialization has ended.
2025-04-23T05:19:51.530548Z 6 [Note] [MY-010454] [Server] A temporary password is generated for root@localhost: fZagl*aJ4p;d #临时密码
[root@localhost ~]#5、启动MySQL
[root@localhost ~]# systemctl start mysql
[root@localhost ~]# systemctl status mysql
● mysql.service - LSB: start and stop MySQL
Loaded: loaded (/etc/rc.d/init.d/mysql; bad; vendor preset: disabled)
Active: active (running) since 三 2025-04-23 13:24:27 CST; 5s ago
Docs: man:systemd-sysv-generator(8)
Process: 3171 ExecStart=/etc/rc.d/init.d/mysql start (code=exited, status=0/SUCCESS)
Tasks: 40
CGroup: /system.slice/mysql.service
├─3176 /bin/sh /usr/local/mysql/bin/mysqld_safe --datadir=/us...
└─3263 /usr/local/mysql/bin/mysqld --basedir=/usr/local/mysql...
4月 23 13:24:25 localhost.localdomain systemd[1]: Starting LSB: start a...
4月 23 13:24:25 localhost.localdomain mysql[3171]: Starting MySQL.Loggi...
4月 23 13:24:27 localhost.localdomain mysql[3171]: . SUCCESS!
4月 23 13:24:27 localhost.localdomain systemd[1]: Started LSB: start an...
Hint: Some lines were ellipsized, use -l to show in full.
[root@localhost ~]#
#登录mysql
[root@localhost ~]# mysql -uroot -p
Enter password: #此处临时密码进行粘贴(不会显示正常回车就好)
Welcome to the MySQL monitor. Commands end with ; or \g.
Your MySQL connection id is 8
Server version: 8.0.30
Copyright (c) 2000, 2022, Oracle and/or its affiliates.
Oracle is a registered trademark of Oracle Corporation and/or its
affiliates. Other names may be trademarks of their respective
owners.
Type 'help;' or '\h' for help. Type '\c' to clear the current input statement.
mysql> show databases;
ERROR 1820 (HY000): You must reset your password using ALTER USER statement before executing this statement.
mysql> #报错原因:需要重置root用户密码
6、配置MySQL
#修改密码
mysql> ALTER USER 'root'@'localhost' IDENTIFIED WITH mysql_native_password BY '123456';
Query OK, 0 rows affected (0.01 sec)

mysql> exit
Bye
[root@localhost ~]# mysql -uroot -p
Enter password:
Welcome to the MySQL monitor.  Commands end with ; or \g.
Your MySQL connection id is 9
Server version: 8.0.30 MySQL Community Server - GPL

Copyright (c) 2000, 2022, Oracle and/or its affiliates.

Oracle is a registered trademark of Oracle Corporation and/or its
affiliates. Other names may be trademarks of their respective
owners.

Type 'help;' or '\h' for help. Type '\c' to clear the current input statement.

mysql> show databases;
+--------------------+
| Database           |
+--------------------+
| information_schema |
| mysql              |
| performance_schema |
| sys                |
+--------------------+
4 rows in set (0.01 sec)

mysql> #访问成功
创建账号,并授权远程访问
mysql> CREATE USER 'root'@'%' IDENTIFIED BY '123456';
Query OK, 0 rows affected (0.01 sec)

mysql> GRANT ALL PRIVILEGES ON *.* TO 'root'@'%';
Query OK, 0 rows affected (0.00 sec)

mysql> FLUSH PRIVILEGES;
Query OK, 0 rows affected (0.00 sec)

mysql>
CMD远程测试(需要关闭防火墙)

7、防火墙操作
注意: 要想在windows上能够访问MySQL,需要开放防火墙的3306端口 或者 直接关闭防火墙 ,执行如下指令:
#方案二:开放防火墙端口
[root@localhost ~]# systemctl start firewalld
[root@localhost ~]# firewall-cmd --zone=public --list-ports
[root@localhost ~]# #没有开放任何端口
#开放3306端口
[root@localhost ~]# firewall-cmd --zone=public --add-port=3306/tcp --permanent
success
[root@localhost ~]# firewall-cmd --reload
success
[root@localhost ~]# firewall-cmd --zone=public --list-ports
3306/tcp #开放了3306端口
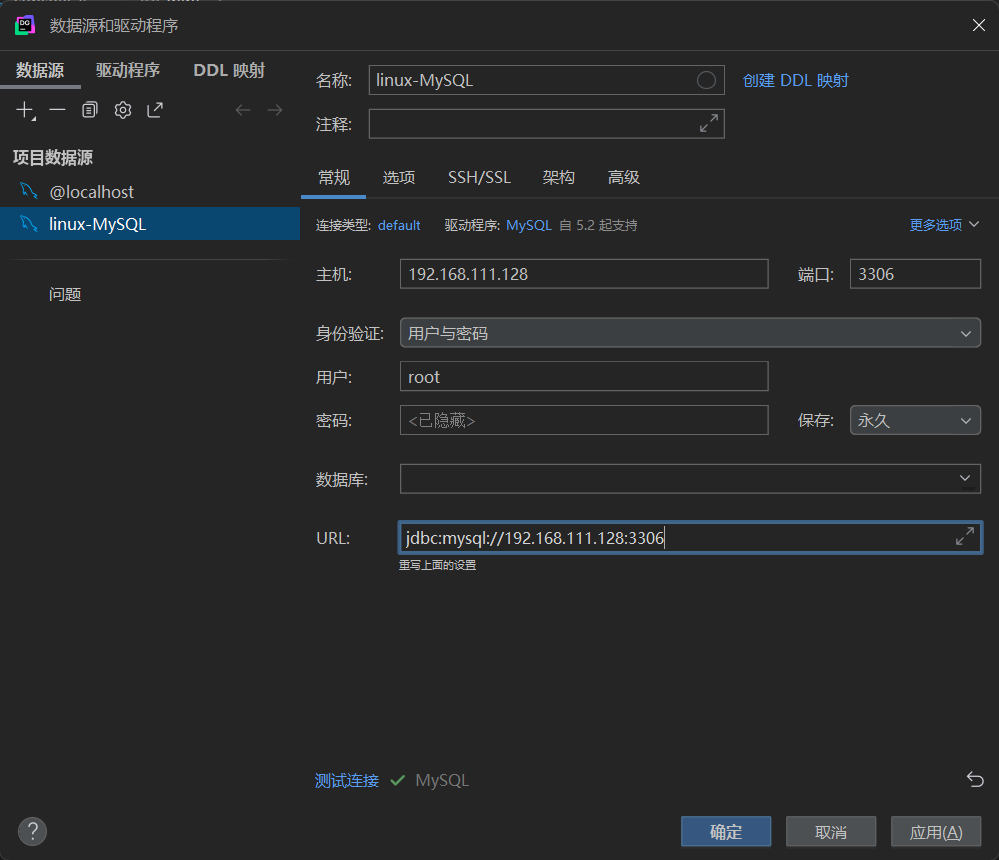
[root@localhost ~]# DataGrip测试连接并导入数据库
三、安装Nginx
1、安装
#安装依赖
[root@localhost ~]# yum install -y pcre pcre-devel zlib zlib-devel openssl openssl-devel
[root@localhost ~]# yum install gcc-c++


#上传源码包并解压
[root@localhost ~]# ll
总用量 764612
-rw-r--r--  1 root root 182487685 4月  23 12:04 jdk-17.0.10_linux-x64_bin.tar.gz
-rw-r--r--  1 root root 599400444 4月  23 12:05 mysql-8.0.30-linux-glibc2.12-x86_64.tar.xz
-rw-r--r--  1 root root   1062124 4月  23 12:05 nginx-1.20.2.tar.gz
[root@localhost ~]# tar -zxvf nginx-1.20.2.tar.gz
进入解压目录后执行命令
#进入解压目录
[root@localhost ~]# cd nginx-1.20.2/

#执行命令配置, 生成Makefile文件
[root@localhost nginx-1.20.2]# ./configure --prefix=/usr/local/nginx

#编译
[root@localhost nginx-1.20.2]# make

#编译安装
[root@localhost nginx-1.20.2]# make install
2、启动
#运行Nginx
[root@localhost nginx]# cd /usr/local/nginx/
[root@localhost nginx]# ll
总用量 0
drwxr-xr-x 2 root root 333 4月  23 14:22 conf
drwxr-xr-x 2 root root  40 4月  23 14:22 html
drwxr-xr-x 2 root root   6 4月  23 14:22 logs
drwxr-xr-x 2 root root  19 4月  23 14:22 sbin
[root@localhost nginx]# sbin/nginx  #运行Nginx
[root@localhost nginx]#


#开放端口号
[root@localhost nginx]# firewall-cmd --zone=public --add-port=80/tcp --permanent
success
[root@localhost nginx]# firewall-cmd --reload
success
[root@localhost nginx]# firewall-cmd --zone=public --list-ports
3306/tcp 80/tcp
[root@localhost nginx]#
访问Nginx

四、项目部署
1、前端项目部署
删除html下的原有文件
[root@localhost ~]# cd /usr/local/nginx/
[root@localhost nginx]# ll html/
总用量 8
-rw-r--r-- 1 root root 494 4月  23 14:22 50x.html
-rw-r--r-- 1 root root 612 4月  23 14:22 index.html
[root@localhost nginx]# rm -rf html/*
[root@localhost nginx]# ll html/
总用量 0
[root@localhost nginx]#
上传前端资源文件
[root@localhost nginx]# cd html/
[root@localhost html]# ll
总用量 12
drwxr-xr-x 2 root root 107 4月 23 17:56 assets
-rw-r--r-- 1 root root 4286 12月 15 2023 favicon.ico
-rw-r--r-- 1 root root 429 4月 23 15:29 index.html
[root@localhost html]#
#修改资料中提供的 nginx.conf 配置文件,将其上传到nginx安装目录下的 conf 目录中.
[root@localhost nginx]# cd /usr/local/nginx/conf/
[root@localhost conf]# cat nginx.conf
……
server {
listen 80;
server_name localhost;
client_max_body_size 10m;
location / {
root html;
index index.html index.htm;
try_files $uri $uri/ /index.html;
}
location ^~ /api/ {
rewrite ^/api/(.*)$ /$1 break;
proxy_pass http://localhost:8080;
}
error_page 500 502 503 504 /50x.html;
location = /50x.html {
root html;
}
}
}
[root@localhost conf]#
#重新启动nginx
[root@localhost conf]# cd ../
[root@localhost nginx]# sbin/nginx -s reload
[root@localhost nginx]#
#停止nginx服务
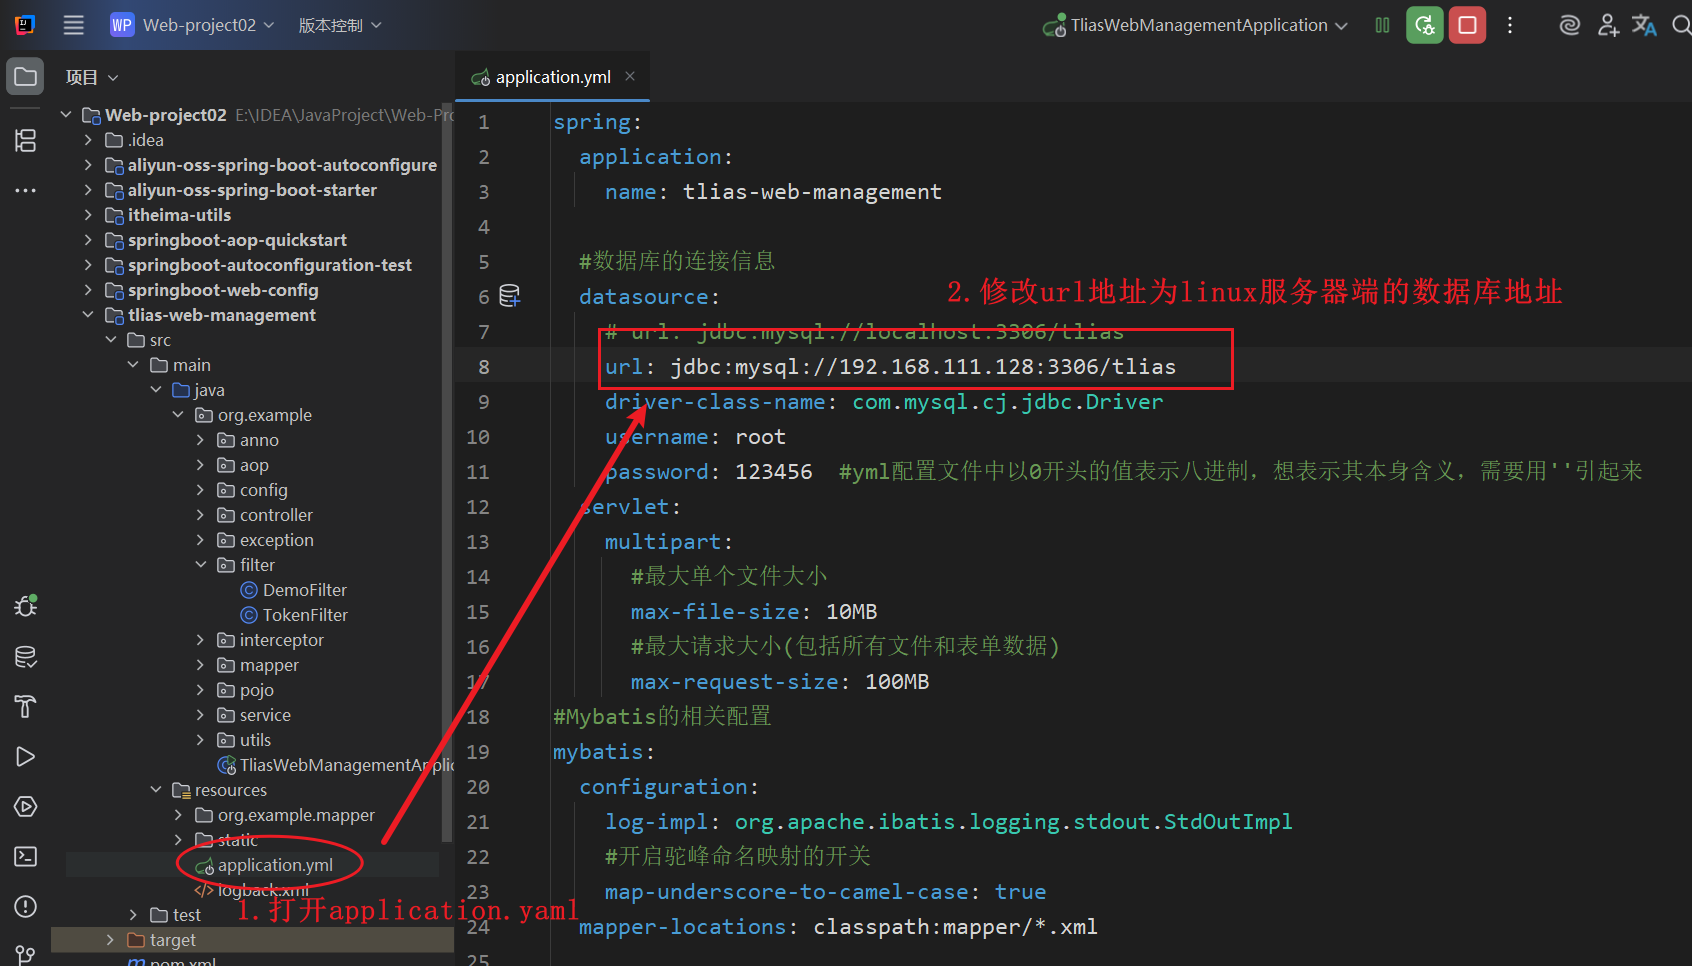
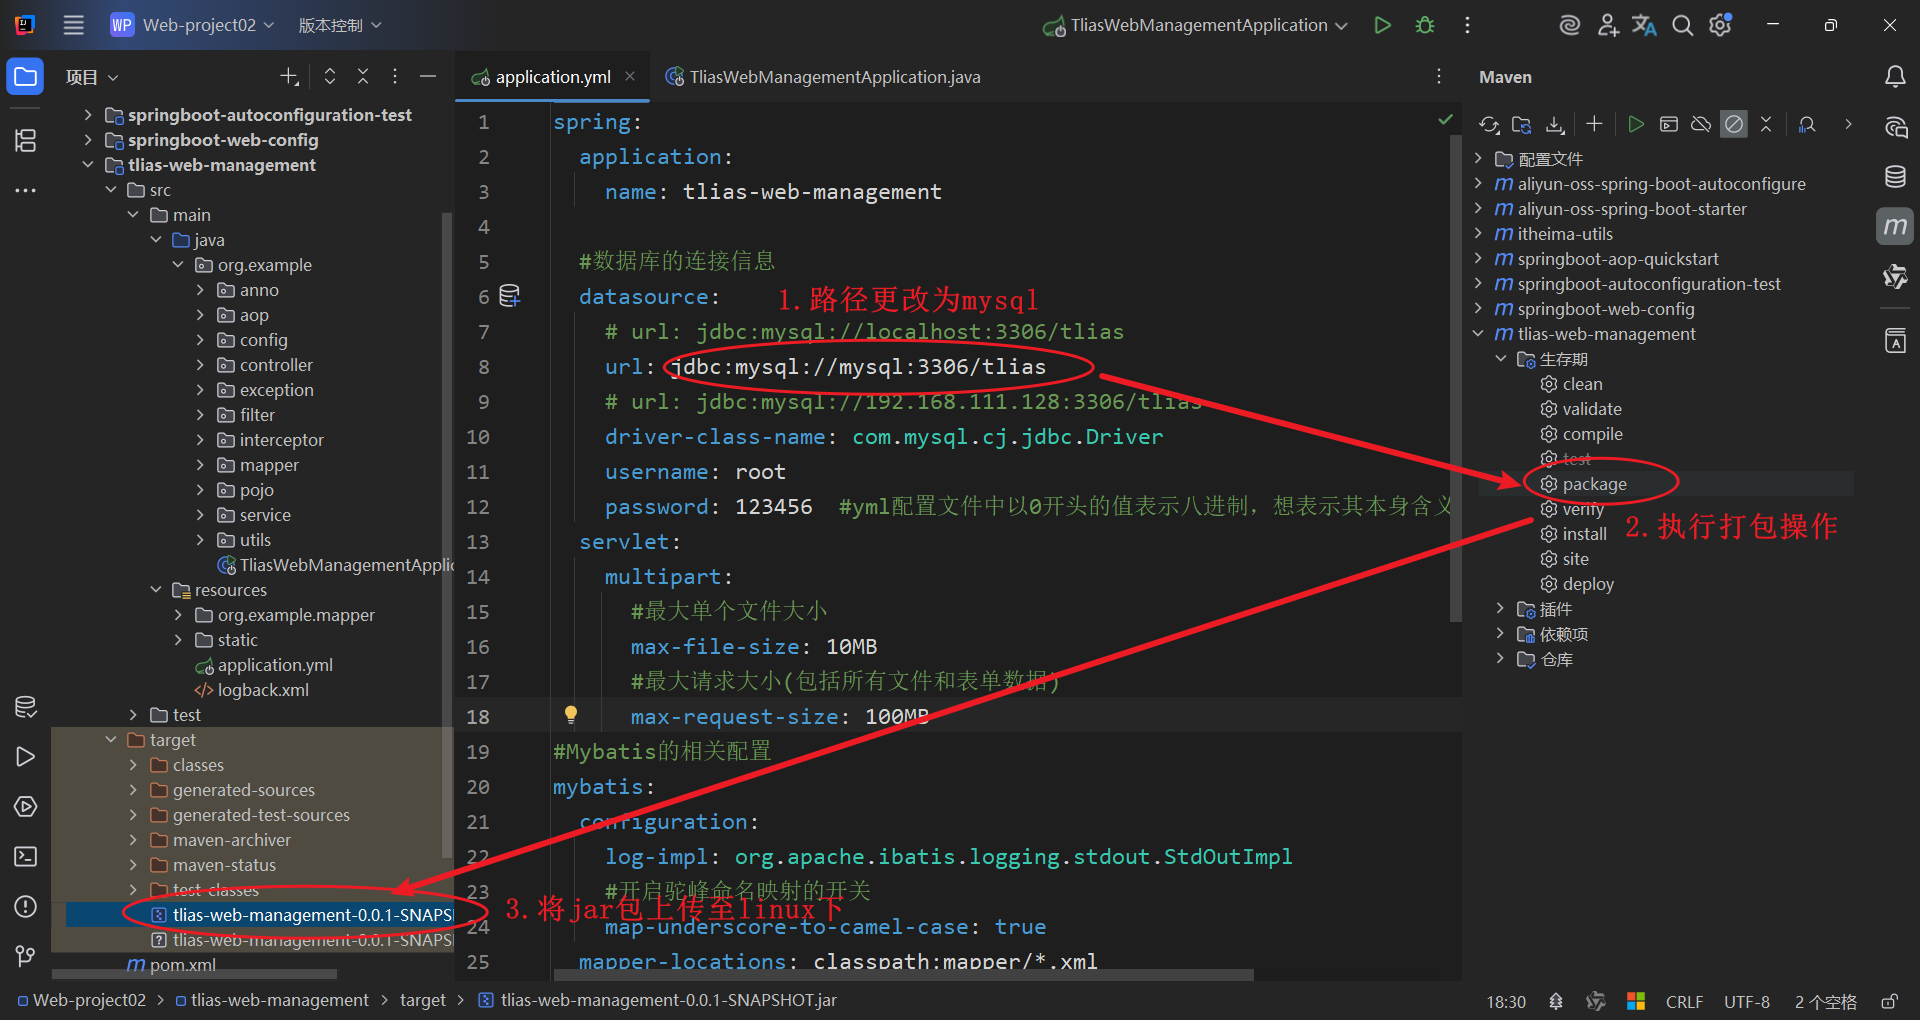
[root@localhost nginx]# sbin/nginx -s quit2、后端项目配置
修改application配置
打包部署
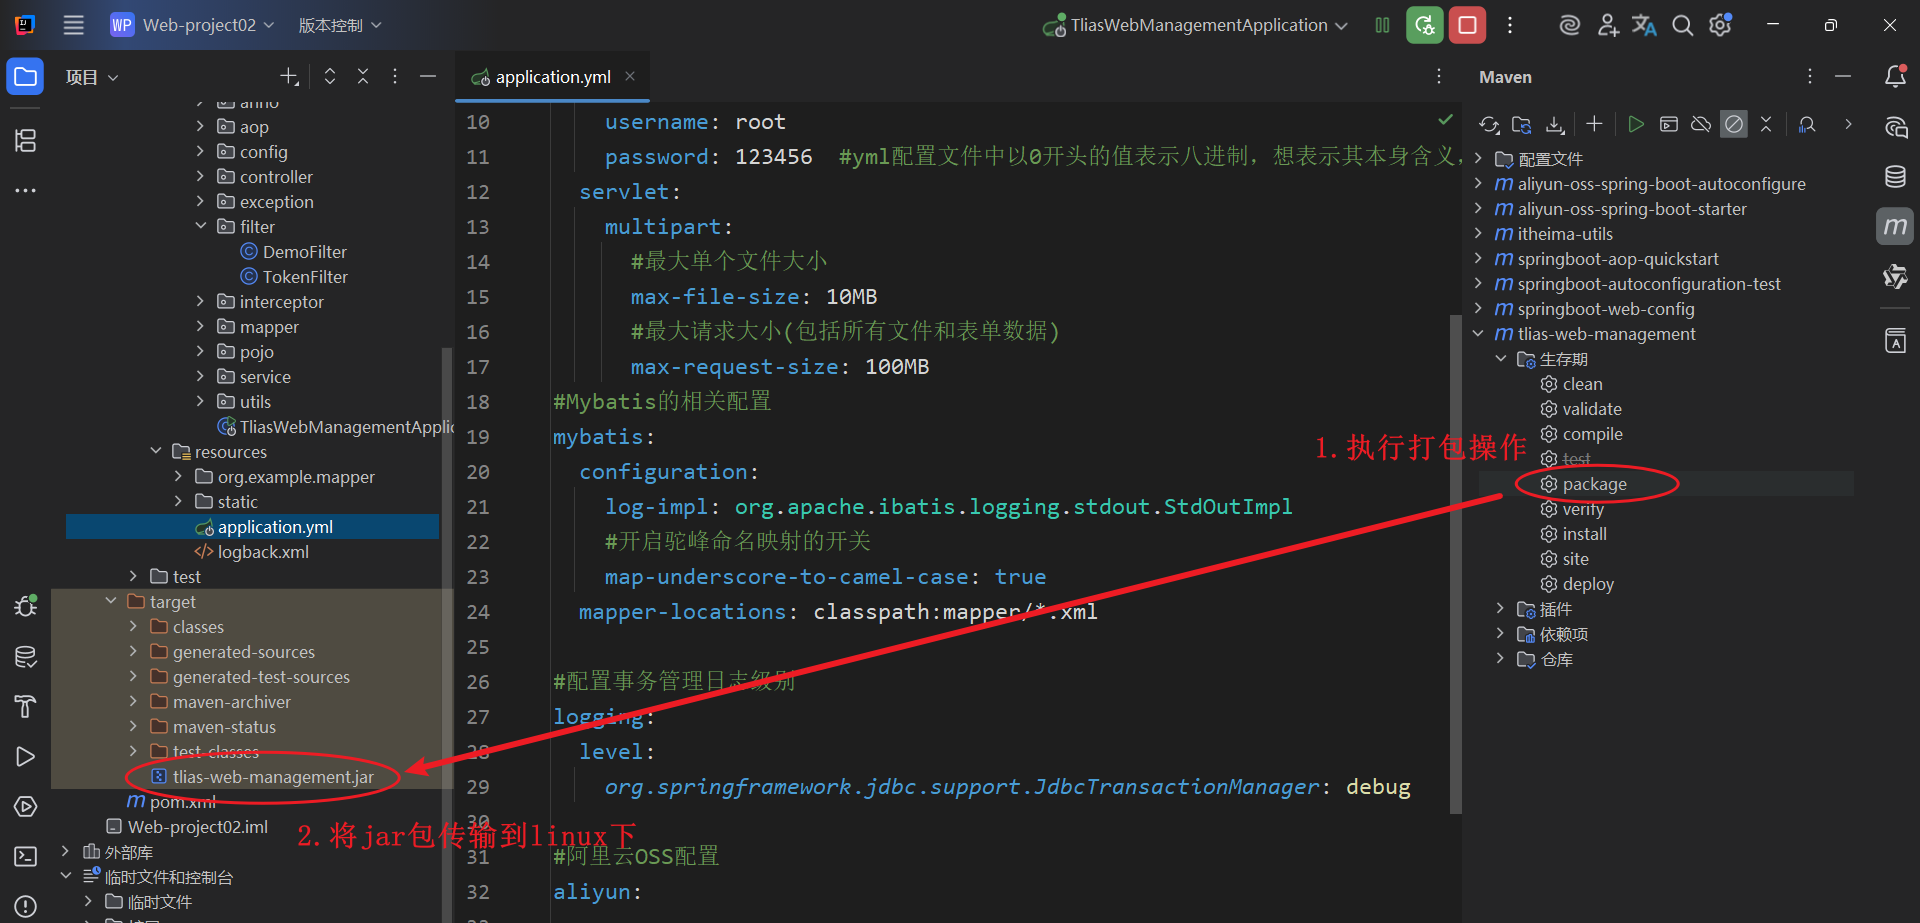
#在Linux服务器上创建一个目录,将jar包上传到服务器
[root@localhost ~]# cd /usr/local/
[root@localhost local]# ll
总用量 0
drwxr-xr-x.  2 root root   6 4月  11 2018 bin
drwxr-xr-x.  2 root root   6 4月  11 2018 etc
drwxr-xr-x.  2 root root   6 4月  11 2018 games
drwxr-xr-x.  2 root root   6 4月  11 2018 include
drwxr-xr-x   9 root root 136 4月  23 12:25 jdk-17.0.10
drwxr-xr-x.  2 root root   6 4月  11 2018 lib
drwxr-xr-x.  2 root root   6 4月  11 2018 lib64
drwxr-xr-x.  2 root root   6 4月  11 2018 libexec
drwxr-xr-x  10 root root 141 4月  23 13:19 mysql
drwxr-xr-x  11 root root 151 4月  23 14:24 nginx
drwxr-xr-x.  2 root root   6 4月  11 2018 sbin
drwxr-xr-x.  5 root root  49 9月   8 2022 share
drwxr-xr-x.  2 root root   6 4月  11 2018 src
[root@localhost local]# mkdir tlias-app
[root@localhost local]# cd tlias-app/
[root@localhost tlias-app]# ll
总用量 34592
-rw-r--r-- 1 root root 35421617 4月  23 18:58 tlias-web-management.jar
[root@localhost tlias-app]#


#运行jar包, 启动项目
[root@localhost tlias-app]# java -jar tlias-web-management.jar

  .   ____          _            __ _ _
 /\\ / ___'_ __ _ _(_)_ __  __ _ \ \ \ \
( ( )\___ | '_ | '_| | '_ \/ _` | \ \ \ \
 \\/  ___)| |_)| | | | | || (_| |  ) ) ) )
  '  |____| .__|_| |_|_| |_\__, | / / / /
 =========|_|==============|___/=/_/_/_/

 :: Spring Boot ::                (v3.4.3)

2025-04-23 19:01:57.462 [main] INFO  org.example.TliasWebManagementApplication - Starting TliasWebManagementApplication v0.0.1-SNAPSHOT using Java 17.0.10 with PID 50500 (/usr/local/tlias-app/tlias-web-management.jar started by root in /usr/local/tlias-app)
2025-04-23 19:01:57.468 [main] INFO  org.example.TliasWebManagementApplication - No active profile set, falling back to 1 default profile: "default"
2025-04-23 19:02:02.525 [main] INFO  o.s.boot.web.embedded.tomcat.TomcatWebServer - Tomcat initialized with port 8080 (http)
2025-04-23 19:02:02.548 [main] INFO  org.apache.coyote.http11.Http11NioProtocol - Initializing ProtocolHandler ["http-nio-8080"]
2025-04-23 19:02:02.553 [main] INFO  org.apache.catalina.core.StandardService - Starting service [Tomcat]
2025-04-23 19:02:02.554 [main] INFO  org.apache.catalina.core.StandardEngine - Starting Servlet engine: [Apache Tomcat/10.1.36]
2025-04-23 19:02:02.668 [main] INFO  o.a.c.core.ContainerBase.[Tomcat].[localhost].[/] - Initializing Spring embedded WebApplicationContext
2025-04-23 19:02:02.670 [main] INFO  o.s.b.w.s.c.ServletWebServerApplicationContext - Root WebApplicationContext: initialization completed in 4915 ms
Logging initialized using 'class org.apache.ibatis.logging.stdout.StdOutImpl' adapter.


,------.                           ,--.  ,--.         ,--.
|  .--. '  ,--,--.  ,---.   ,---.  |  '--'  |  ,---.  |  |  ,---.   ,---.  ,--.--.
|  '--' | ' ,-.  | | .-. | | .-. : |  .--.  | | .-. : |  | | .-. | | .-. : |  .--'
|  | --'  \ '-'  | ' '-' ' \   --. |  |  |  | \   --. |  | | '-' ' \   --. |  |
`--'       `--`--' .`-  /   `----' `--'  `--'  `----' `--' |  |-'   `----' `--'
                   `---'                                   `--'                        is intercepting.

2025-04-23 19:02:05.779 [main] INFO  org.apache.coyote.http11.Http11NioProtocol - Starting ProtocolHandler ["http-nio-8080"]
2025-04-23 19:02:05.859 [main] INFO  o.s.boot.web.embedded.tomcat.TomcatWebServer - Tomcat started on port 8080 (http) with context path '/'
2025-04-23 19:02:05.913 [main] INFO  org.example.TliasWebManagementApplication - Started TliasWebManagementApplication in 10.528 seconds (process running for 13.664)
上传文件失败
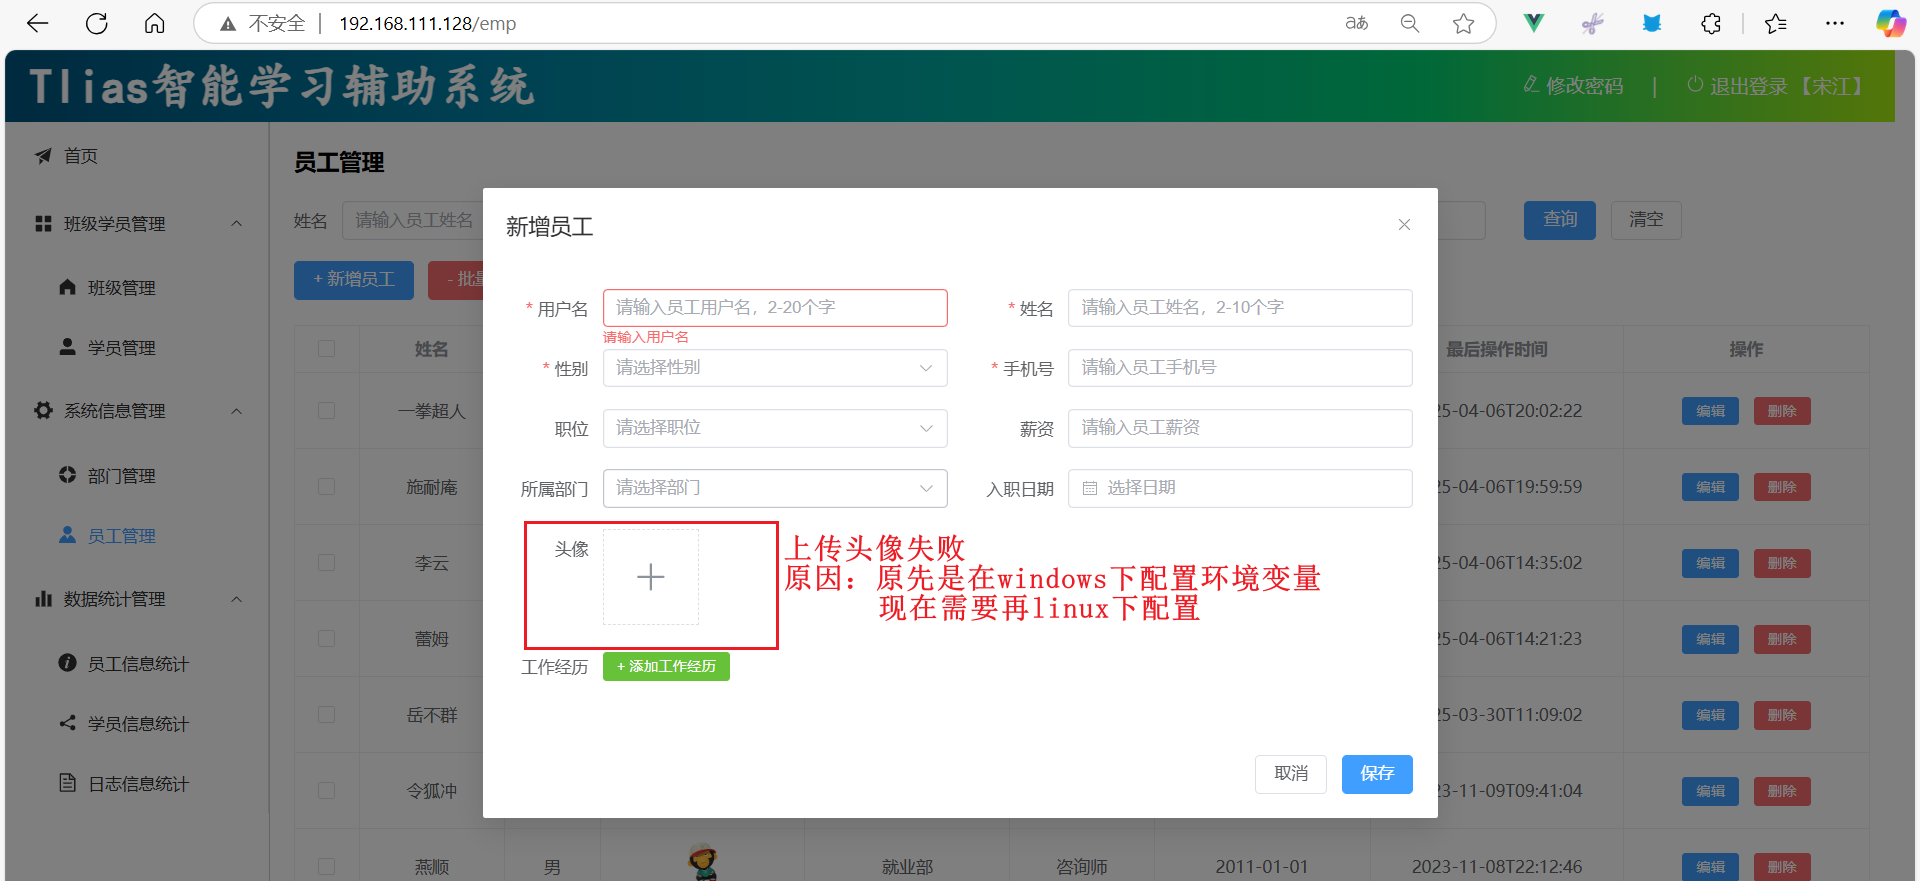
添加环境变量
[root@localhost ~]# vim /etc/profile
export MYSQL_HOME=/usr/local/mysql
export PATH=$MYSQL_HOME/bin:$PATH
export JAVA_HOME=/usr/local/jdk-17.0.10
export PATH=$JAVA_HOME/bin:$PATH
#新增环境变量
export OSS_ACCESS_KEY_ID=LTAI5tDqTpEYcULzryPRc8hU
export OSS_ACCESS_KEY_SECRET=Bike0vjcmeq6mhdSGF4zA3pODzPzv3
"/etc/profile" 86L, 2075C 已写入
[root@localhost ~]# source /etc/profile
[root@localhost ~]#
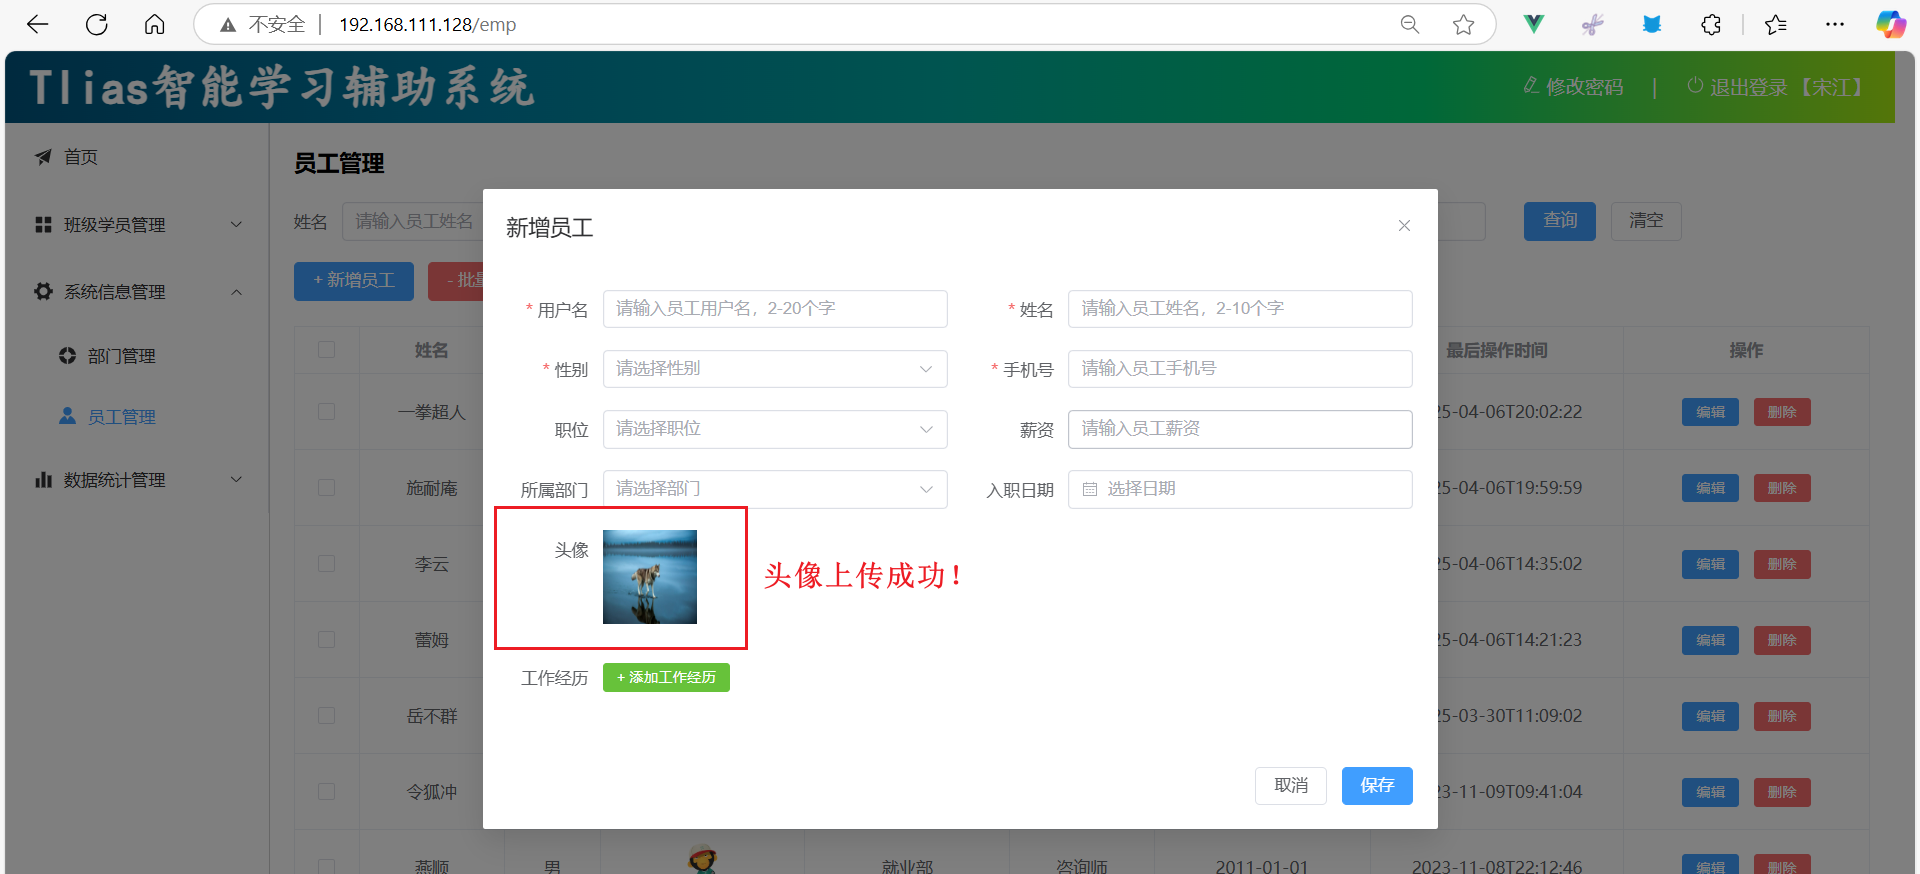
#将原有服务的终端关闭重新打开使环境配置生效
[root@localhost ~]# cd /usr/local/tlias-app/
[root@localhost tlias-app]# java -jar tlias-web-management.jar检查文件上传
后台启动jar包
[root@localhost tlias-app]# nohup java -jar tlias-web-management.jar &> tlias.log &
[1] 89688
[root@localhost tlias-app]#


#实时显示日志信息
[root@localhost tlias-app]# tail -f  tlias.log
<==        Row: 16, luzhishen, 123456, 鲁智深, 1, 13309090016, 2, 9600, https://web-framework.oss-cn-hangzhou.aliyuncs.com/2023/1.jpg, 2010-01-01, 2, 2023-10-20 16:35:33, 2023-10-20 16:36:05, 教研部
<==        Row: 15, sunerniang, 123456, 孙二娘, 2, 13309090015, 2, 10900, https://web-framework.oss-cn-hangzhou.aliyuncs.com/2023/1.jpg, 2011-05-01, 2, 2023-10-20 16:35:33, 2023-10-20 16:36:03, 教研部
<==        Row: 14, shijin, 123456, 史进, 1, 13309090014, 2, 10600, https://web-framework.oss-cn-hangzhou.aliyuncs.com/2023/1.jpg, 2002-08-01, 2, 2023-10-20 16:35:33, 2023-10-20 16:36:01, 教研部
<==        Row: 13, yangzhi, 123456, 杨志, 1, 13309090013, 1, 5300, https://web-framework.oss-cn-hangzhou.aliyuncs.com/2023/1.jpg, 2012-11-01, 1, 2023-10-20 16:35:33, 2023-10-20 16:35:59, 学工部
<==        Row: 12, xiaoliguang, 123456, 小李广, 1, 13309090012, 2, 10000, https://web-framework.oss-cn-hangzhou.aliyuncs.com/2023/1.jpg, 2008-08-18, 2, 2023-10-20 16:35:33, 2023-10-20 16:35:57, 教研部
<==        Row: 11, huyanzhuo, 123456, 呼延灼, 1, 13309090011, 2, 9700, https://web-framework.oss-cn-hangzhou.aliyuncs.com/2023/1.jpg, 2007-02-01, 2, 2023-10-20 16:35:33, 2023-10-20 16:35:55, 教研部
<==        Row: 10, linchong, 123456, 林冲, 1, 13309090010, 1, 5000, https://web-framework.oss-cn-hangzhou.aliyuncs.com/2023/1.jpg, 2013-09-05, 1, 2023-10-20 16:35:33, 2023-10-20 16:35:53, 学工部
<==        Row: 9, wusong, 123456, 武松, 1, 13309090009, 1, 4900, https://web-framework.oss-cn-hangzhou.aliyuncs.com/2023/1.jpg, 2011-03-11, 1, 2023-10-20 16:35:33, 2023-10-20 16:35:51, 学工部
<==      Total: 10
Closing non transactional SqlSession [org.apache.ibatis.session.defaults.DefaultSqlSession@1ae98620]


#杀死进程
[root@localhost tlias-app]# netstat -tnlup | grep java
tcp6       0      0 :::8080                 :::*                    LISTEN      89688/java
[root@localhost tlias-app]# kill -9 89688
[root@localhost tlias-app]# ps -ef | grep java
root      98627  70384  0 19:38 pts/0    00:00:00 grep --color=auto java
[1]+  已杀死               nohup java -jar tlias-web-management.jar &>tlias.log
[root@localhost tlias-app]#
Docker项目部署
一、Docker安装
1、卸载旧版
#首先如果系统中已经存在旧的Docker,则先卸载:
yum remove docker \
    docker-client \
    docker-client-latest \
    docker-common \
    docker-latest \
    docker-latest-logrotate \
    docker-logrotate \
    docker-engine \
    docker-selinux
2、配置yum库
首先要安装一个yum工具
sudo yum install -y yum-utils device-mapper-persistent-data lvm2安装成功后,执行命令,配置Docker的yum源(已更新为阿里云源)
sudo yum-config-manager --add-repo https://mirrors.aliyun.com/docker-ce/linux/centos/docker-ce.repo

sudo sed -i 's+download.docker.com+mirrors.aliyun.com/docker-ce+' /etc/yum.repos.d/docker-ce.repo
更新yum,建立缓存
sudo yum makecache fast3、安装Docker
yum install -y docker-ce docker-ce-cli containerd.io docker-buildx-plugin docker-compose-plugin4、启动和校验
# 启动Docker
systemctl start docker

# 停止Docker
systemctl stop docker

# 重启
systemctl restart docker

# 设置开机自启
systemctl enable docker

# 执行docker ps命令,如果不报错,说明安装启动成功
docker ps
5、配置镜像加速
# 创建目录
rm -f /etc/docker/daemon.json

# 复制内容
tee /etc/docker/daemon.json <<-'EOF'
{
    "registry-mirrors": [
        "http://hub-mirror.c.163.com",
        "https://mirrors.tuna.tsinghua.edu.cn",
        "http://mirrors.sohu.com",
        "https://ustc-edu-cn.mirror.aliyuncs.com",
        "https://ccr.ccs.tencentyun.com",
        "https://docker.m.daocloud.io",
        "https://docker.awsl9527.cn"
    ]
}
EOF

# 重新加载配置
systemctl daemon-reload

# 重启Docker
systemctl restart docker
二、快速入门
首先,我们利用Docker来安装一个MySQL软件,大家可以对比一下之前传统的安装方式,看看哪个效率更高一些。
如果是利用传统方式部署MySQL,大概的步骤有:
搜索并下载MySQL安装包
上传至Linux环境
解压和配置环境
安装
初始化和配置
而使用Docker安装,仅仅需要一步即可,在命令行输入下面的命令(建议采用CV大法):
docker run -d \
  --name mysql \
  -p 3307:3306 \
  -e TZ=Asia/Shanghai \
  -e MYSQL_ROOT_PASSWORD=123 \
  mysql:8
解读:
docker run -d:创建并运行一个容器,-d则是让容器以后台进程运行--name mysql: 给容器起个名字叫mysql,你可以叫别的-p 3307:3306: 设置端口映射。容器是隔离环境,外界不可访问。但是可以将宿主机端口映射容器内到端口,当访问宿主机指定端口时,就是在访问容器内的端口了。
容器内端口往往是由容器内的进程决定,例如MySQL进程默认端口是3306,因此容器内端口一定是3306;而宿主机端口则可以任意指定,一般与容器内保持一致。
格式:
-p 宿主机端口:容器内端口,示例中就是将宿主机的3307映射到容器内的3306端口
-e TZ=Asia/Shanghai: 配置容器内进程运行时的一些参数格式:
-e KEY=VALUE,KEY和VALUE都由容器内进程决定案例中,
TZ=Asia/Shanghai是设置时区;MYSQL_ROOT_PASSWORD=123是设置MySQL默认密码
mysql:8: 设置镜像名称,Docker会根据这个名字搜索并下载镜像格式:
REPOSITORY:TAG,例如mysql:8.0,其中REPOSITORY可以理解为镜像名,TAG是版本号在未指定
TAG的情况下,默认是最新版本,也就是mysql:latest
三、Docker基础
1、常见命令
1.1 命令介绍
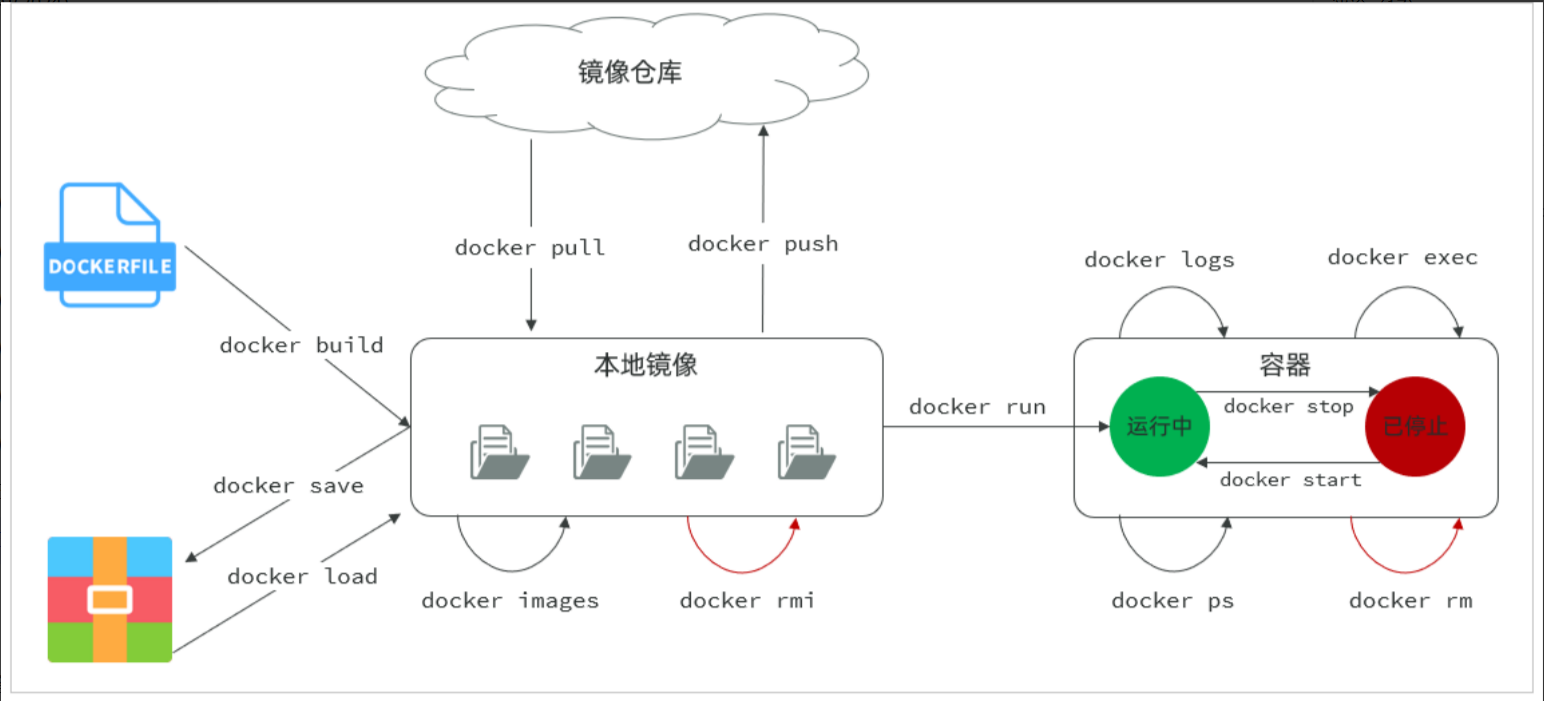
其中,比较常见的命令有:
用一副图来表示这些命令的关系:
补充:
默认情况下,每次重启虚拟机我们都需要手动启动Docker和Docker中的容器。通过命令可以实现开机自启:
# Docker开机自启
systemctl enable docker

# Docker容器开机自启
docker update --restart=always [容器名/容器id]
1.2 演示
# 第1步,去DockerHub查看nginx镜像仓库及相关信息

# 第2步,拉取Nginx镜像 (比较耗时)
docker pull nginx:1.20.2

# 第3步,查看镜像
docker images

# 第4步,创建并允许Nginx容器
docker run -d --name nginx -p 80:80 nginx

# 第5步,查看运行中容器
docker ps

# 也可以加格式化方式访问,格式会更加清爽
docker ps --format "table {{.ID}}\t{{.Image}}\t{{.Ports}}\t{{.Status}}\t{{.Names}}"

# 第6步,访问网页,地址:http://虚拟机地址

# 第7步,停止容器
docker stop nginx

# 第8步,查看所有容器
docker ps -a --format "table {{.ID}}\t{{.Image}}\t{{.Ports}}\t{{.Status}}\t{{.Names}}"

# 第9步,再次启动nginx容器
docker start nginx

# 第10步,再次查看容器
docker ps --format "table {{.ID}}\t{{.Image}}\t{{.Ports}}\t{{.Status}}\t{{.Names}}"

# 第11步,查看容器详细信息
docker inspect nginx

# 第12步,进入容器,查看容器内目录
docker exec -it nginx bash

# 或者,可以进入MySQL
docker exec -it mysql mysql -uroot -p

# 第13步,删除容器
docker rm nginx

# 发现无法删除,因为容器运行中,强制删除容器
docker rm -f nginx
小结
2、数据卷
容器是隔离环境,容器内程序的文件、配置、运行时产生的容器都在容器内部,我们要读写容器内的文件非常不方便。大家思考几个问题:
如果要升级MySQL版本,需要销毁旧容器,那么数据岂不是跟着被销毁了?
MySQL、Nginx容器运行后,如果我要修改其中的某些配置该怎么办?
我想要让Nginx代理我的静态资源怎么办?
因此,容器提供程序的运行环境,但是 程序运行产生的数据、程序运行依赖的配置都应该与容器解耦。
2.1 介绍
数据卷(volume)是一个虚拟目录,是容器内目录与宿主机目录之间映射的桥梁。
以Nginx为例,我们知道Nginx中有两个关键的目录:
html:放置一些静态资源conf:放置配置文件
如果我们要让Nginx代理我们的静态资源,最好是放到html目录;如果我们要修改Nginx的配置,最好是找到conf下的nginx.conf文件。
但遗憾的是,容器运行的Nginx所有的文件都在容器内部。所以我们必须利用数据卷将两个目录与宿主机目录关联,方便我们操作。
如图:
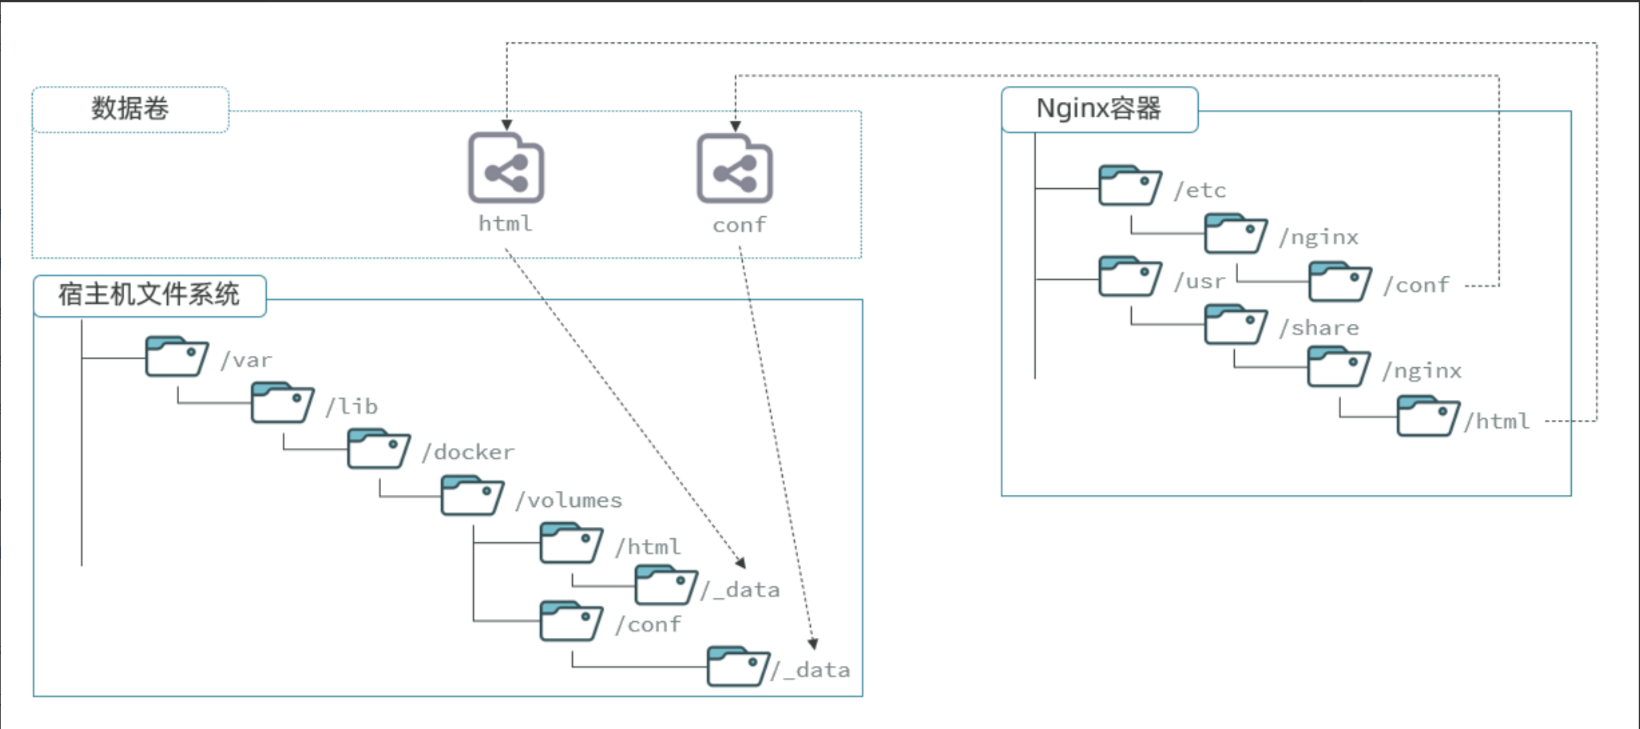
在上图中:
我们创建了两个数据卷:
conf、htmlNginx容器内部的
conf目录和html目录分别与两个数据卷关联。而数据卷conf和html分别指向了宿主机的
/var/lib/docker/volumes/conf/_data目录和/var/lib/docker/volumes/html/_data目录
这样以来,容器内的conf和html目录就 与宿主机的conf和html目录关联起来,我们称为挂载。
此时,我们操作宿主机的/var/lib/docker/volumes/html/_data就是在操作容器内的/usr/share/nginx/html/_data目录。只要我们将静态资源放入宿主机对应目录,就可以被Nginx代理了。
小提示:
/var/lib/docker/volumes这个目录就是默认的存放所有容器数据卷的目录,其下再根据数据卷名称创建新目录,格式为/数据卷名/_data。为什么不让容器目录直接指向宿主机目录呢?
因为直接指向宿主机目录就与宿主机强耦合了,如果切换了环境,宿主机目录就可能发生改变了。由于容器一旦创建,目录挂载就无法修改,这样容器就无法正常工作了。
但是容器指向数据卷,一个逻辑名称,而数据卷再指向宿主机目录,就不存在强耦合。如果宿主机目录发生改变,只要改变数据卷与宿主机目录之间的映射关系即可。
不过,我们通过由于数据卷目录比较深,不好寻找,通常我们也允许让容器直接与宿主机目录挂载而不使用数据卷,具体参考2.3小节。
2.2 命令
数据卷的相关命令有:
注意:容器与数据卷的挂载要在创建容器时配置,对于创建好的容器,是不能设置数据卷的。而且创建容器的过程中,数据卷会自动创建。
教学演示环节:演示一下nginx的html目录挂载
# 1.首先创建容器并指定数据卷,注意通过 -v 参数来指定数据卷
docker run -d --name nginx -p 80:80 -v html:/usr/share/nginx/html nginx:1.20.2

# 2.然后查看数据卷
docker volume ls


# 3.查看数据卷详情
docker volume inspect html
# 或者
[root@localhost html]# docker inspect nginx | grep -E 'Source|Destination' -n5
148-        },
149-        "Mounts": [
150-            {
151-                "Type": "volume",
152-                "Name": "html",
153:                "Source": "/var/lib/docker/volumes/html/_data",  #宿主机挂载目录
154:                "Destination": "/usr/share/nginx/html",		     #容器挂载目录
155-                "Driver": "local",
156-                "Mode": "z",
157-                "RW": true,
158-                "Propagation": ""
159-            }
[root@localhost html]#


# 4.查看/var/lib/docker/volumes/html/_data目录
ll /var/lib/docker/volumes/html/_data


# 5.进入该目录,并随意修改index.html内容
cd /var/lib/docker/volumes/html/_data
vi index.html

# 6.打开页面,查看效果

# 7.进入容器内部,查看/usr/share/nginx/html目录内的文件是否变化
docker exec -it nginx bash教学演示环节:演示一下MySQL的匿名数据卷
# 1.查看MySQL容器详细信息
docker inspect mysql

# 关注其中.Config.Volumes部分和.Mounts部分我们关注两部分内容,第一是.Config.Volumes部分:
{
  "Config": {
    // ... 略
    "Volumes": {
      "/var/lib/mysql": {}
    }
    // ... 略
  }
}可以发现这个容器声明了一个本地目录,需要挂载数据卷,但是数据卷未定义。这就是匿名卷。
然后,我们再看结果中的.Mounts部分:
[root@localhost ~]# docker inspect mysql | grep -iE 'Source|Destination' -n5
142-        },
143-        "Mounts": [
144-            {
145-                "Type": "volume",
146-                "Name": "0a73eb7691321de581d7b2bd012f373df58f6eed262fe50ea5ad9dfc5104bb04",
147:                "Source": "/var/lib/docker/volumes/0a73eb7691321de581d7b2bd012f373df58f6eed262fe50ea5ad9dfc5104bb04/_data",
148:                "Destination": "/var/lib/mysql",
149-                "Driver": "local",
150-                "Mode": "",
151-                "RW": true,
152-                "Propagation": ""
153-            }
[root@localhost ~]#
可以发现,其中有几个关键属性:
Name:数据卷名称。由于定义容器未设置容器名,这里的就是匿名卷自动生成的名字,一串hash值。
Source:宿主机目录
Destination : 容器内的目录
上述配置是将容器内的/var/lib/mysql这个目录,与数据卷0a73eb7691321de581d7b2bd012f373df58f6eed262fe50ea5ad9dfc5104bb04挂载。于是在宿主机中就有了/var/lib/docker/volumes/0a73eb7691321de581d7b2bd012f373df58f6eed262fe50ea5ad9dfc5104bb04/_data这个目录。这就是匿名数据卷对应的目录,其使用方式与普通数据卷没有差别。
如果容器被删了,那么匿名数据卷不用的话也可以删除掉
[root@localhost _data]# docker volume ls
DRIVER    VOLUME NAME
local     0a73eb7691321de581d7b2bd012f373df58f6eed262fe50ea5ad9dfc5104bb04
local     html
[root@localhost _data]#

#删除单个数据卷
docker volume rm [VOLUME NAME]
#删除未被容器使用的数据卷
docker volume prune
2.3 挂载本地目录
可以发现,数据卷的目录结构较深,如果我们去操作数据卷目录会不太方便。在很多情况下,我们会直接将容器目录与宿主机指定目录挂载。挂载语法与数据卷类似:
# 挂载本地目录
-v 本地目录:容器内目录

# 挂载本地文件
-v 本地文件:容器内文件注意:本地目录或文件必须以 / 或 ./开头,如果直接以名字开头,会被识别为数据卷名而非本地目录名。
例如:
-v mysql:/var/lib/mysql # 会被识别为一个数据卷叫mysql,运行时会自动创建这个数据卷

-v ./mysql:/var/lib/mysql # 会被识别为当前目录下的mysql目录,运行时如果不存在会创建目录教学演示,删除并重新创建mysql容器,并完成本地目录挂载:
挂载
/root/mysql/data到容器内的/var/lib/mysql目录挂载
/root/mysql/init到容器内的/docker-entrypoint-initdb.d目录(初始化的SQL脚本目录)挂载
/root/mysql/conf到容器内的/etc/mysql/conf.d目录(这个是MySQL配置文件目录)
在课前资料中已经准备好了mysql 的init目录(自动化执行sql脚本)、conf目录、data目录,可以直接将其上传到Linux服务器中的 /root/mysql 目录下。
最终执行的指令如下:
#上传至Linux
[root@localhost mysql]# pwd
/root/mysql
[root@localhost mysql]# ll
总用量 0
drwxr-xr-x 2 root root  6 4月  24 20:55 conf
drwxr-xr-x 2 root root  6 4月  24 20:55 data
drwxr-xr-x 2 root root 53 4月  24 20:55 init
[root@localhost mysql]# ll init/
总用量 40
-rw-r--r-- 1 root root 39211 4月  24 20:55 _localhost-2025_04_23_13_54_37-dump.sql
[root@localhost mysql]#


#启动容器
docker run -d \
--name mysql \
-p 3307:3306 \
-e MYSQL_ROOT_PASSWORD=123456 \
-e TZ=Asia/Shanghai \
-v /root/mysql/data:/var/lib/mysql \
-v /root/mysql/init:/docker-entrypoint-initdb.d \
-v /root/mysql/conf:/etc/mysql/conf.d \
mysql:8


#查看data目录
[root@localhost mysql]# ll data/
总用量 112596
-rw-r----- 1 polkitd input       56 4月  24 21:00 auto.cnf
-rw-r----- 1 polkitd input  3023176 4月  24 21:00 binlog.000001
-rw-r----- 1 polkitd input      158 4月  24 21:00 binlog.000002
-rw-r----- 1 polkitd input       32 4月  24 21:00 binlog.index
-rw------- 1 polkitd input     1705 4月  24 21:00 ca-key.pem
-rw-r--r-- 1 polkitd input     1108 4月  24 21:00 ca.pem
-rw-r--r-- 1 polkitd input     1108 4月  24 21:00 client-cert.pem
-rw------- 1 polkitd input     1705 4月  24 21:00 client-key.pem
-rw-r----- 1 polkitd input  6291456 4月  24 21:02 #ib_16384_0.dblwr
-rw-r----- 1 polkitd input 14680064 4月  24 21:00 #ib_16384_1.dblwr
-rw-r----- 1 polkitd input     5371 4月  24 21:00 ib_buffer_pool
-rw-r----- 1 polkitd input 12582912 4月  24 21:00 ibdata1
-rw-r----- 1 polkitd input 12582912 4月  24 21:00 ibtmp1
drwxr-x--- 2 polkitd input     4096 4月  24 21:00 #innodb_redo
drwxr-x--- 2 polkitd input      187 4月  24 21:00 #innodb_temp
drwxr-x--- 2 polkitd input      143 4月  24 21:00 mysql
-rw-r----- 1 polkitd input 32505856 4月  24 21:00 mysql.ibd
lrwxrwxrwx 1 polkitd input       27 4月  24 21:00 mysql.sock -> /var/run/mysqld/mysqld.sock
-rw-r----- 1 polkitd input      124 4月  24 21:00 mysql_upgrade_history
drwxr-x--- 2 polkitd input     8192 4月  24 21:00 performance_schema
-rw------- 1 polkitd input     1705 4月  24 21:00 private_key.pem
-rw-r--r-- 1 polkitd input      452 4月  24 21:00 public_key.pem
-rw-r--r-- 1 polkitd input     1108 4月  24 21:00 server-cert.pem
-rw------- 1 polkitd input     1705 4月  24 21:00 server-key.pem
drwxr-x--- 2 polkitd input       28 4月  24 21:00 sys
drwxr-x--- 2 polkitd input      135 4月  24 21:00 tlias   #init目录自动化执行里面的sql脚本,自动创建完毕tlias数据库
-rw-r----- 1 polkitd input 16777216 4月  24 21:02 undo_001
-rw-r----- 1 polkitd input 16777216 4月  24 21:02 undo_002
[root@localhost mysql]#
3、自定义镜像
3.1 镜像结构
要想自己构建镜像,必须先了解镜像的结构。
之前我们说过,镜像之所以能让我们快速跨操作系统部署应用而忽略其运行环境、配置,就是因为镜像中包含了程序运行需要的系统函数库、环境、配置、依赖。
因此,自定义镜像本质就是依次准备好程序运行的基础环境、依赖、应用本身、运行配置等文件,并且打包而成。
举个例子,我们要从0部署一个Java应用,大概流程是这样:
准备一个linux服务(CentOS或者Ubuntu均可)
安装并配置JDK
上传Jar包
运行jar包
那因此,我们打包镜像也是分成这么几步:
准备Linux运行环境(java项目并不需要完整的操作系统,仅仅是基础运行环境即可)
安装并配置JDK
拷贝jar包
配置启动脚本
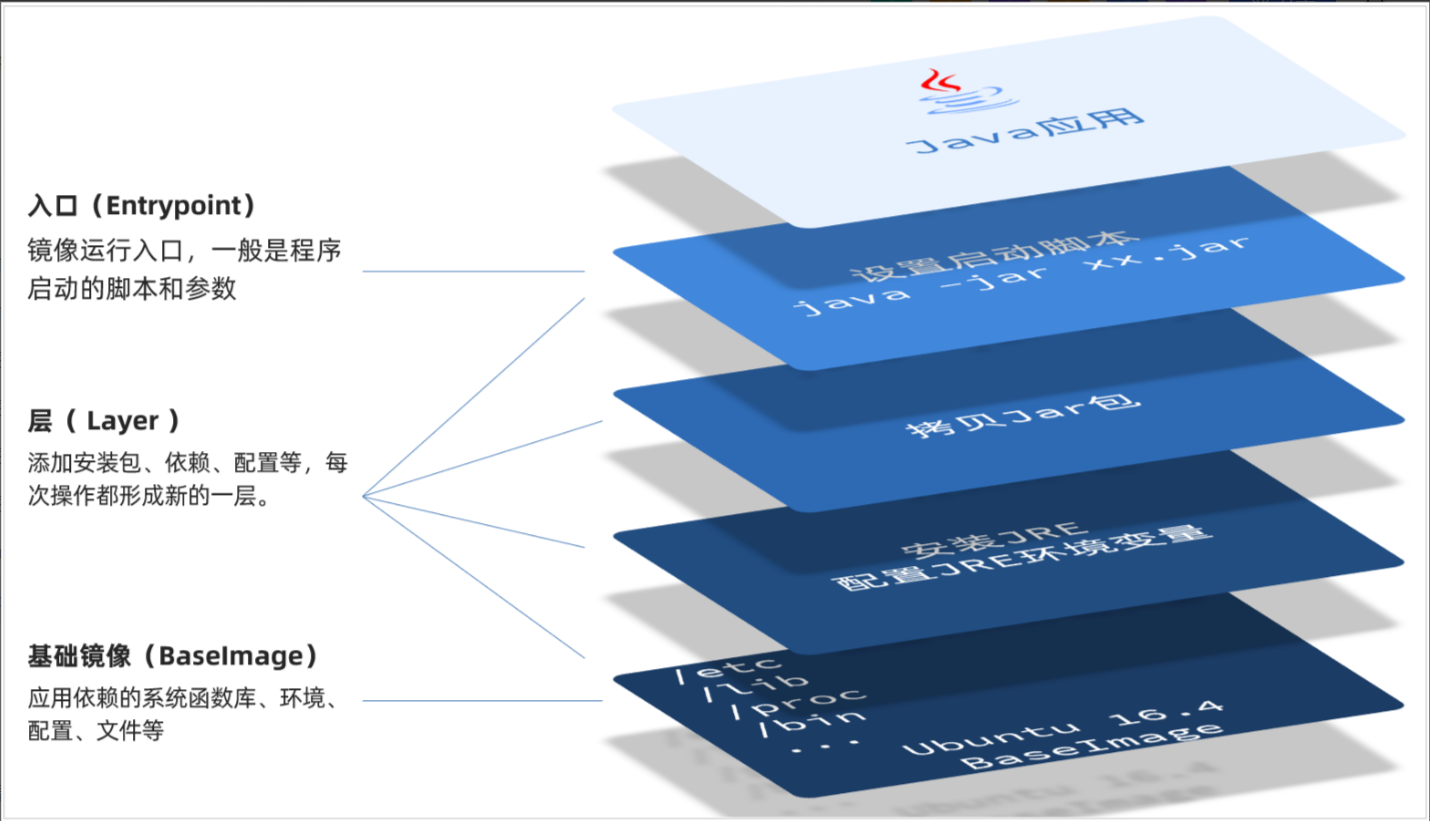
上述步骤中的每一次操作其实都是在生产一些文件(系统运行环境、函数库、配置最终都是磁盘文件),所以镜像就是一堆文件的集合。
但需要注意的是,镜像文件不是随意堆放的,而是按照操作的步骤分层叠加而成,每一层形成的文件都会单独打包并标记一个唯一id,称为Layer(层)。这样,如果我们构建时用到的某些层其他人已经制作过,就可以直接拷贝使用这些层,而不用重复制作。
例如,第一步中需要的Linux运行环境,通用性就很强,所以Docker官方就制作了这样的只包含Linux运行环境的镜像。我们在制作java镜像时,就无需重复制作,直接使用Docker官方提供的CentOS或Ubuntu镜像作为基础镜像。然后再搭建其它层即可,这样逐层搭建,最终整个Java项目的镜像结构如图所示:
3.2 Dockerfile
由于制作镜像的过程中,需要逐层处理和打包,比较复杂,所以Docker就提供了自动打包镜像的功能。我们只需要将打包的过程,每一层要做的事情用固定的语法写下来,交给Docker去执行即可。而这种记录镜像结构的文件就称为Dockerfile。
其中的语法比较多,比较常用的有:
例如,要基于 centos:7 镜像来构建一个Java应用,其Dockerfile内容如下:
# 使用 CentOS 7 作为基础镜像
FROM centos:7

# 添加 JDK 到镜像中
COPY jdk17.tar.gz /usr/local/
RUN tar -xzf /usr/local/jdk17.tar.gz -C /usr/local/ &&  rm /usr/local/jdk17.tar.gz

# 设置环境变量
ENV JAVA_HOME=/usr/local/jdk-17.0.10
ENV PATH=$JAVA_HOME/bin:$PATH

# 创建应用目录
RUN mkdir -p /app
WORKDIR /app

# 复制应用 JAR 文件到容器
COPY app.jar app.jar

# 暴露端口
EXPOSE 8080

# 运行命令
ENTRYPOINT ["java","-Djava.security.egd=file:/dev/./urandom","-jar","/app/app.jar"]
Dockerfile文件编写好了之后,就可以使用如下命令来构建镜像了。
docker build -t 镜像名 .-t :是给镜像起名,格式依然是repository:tag的格式,不指定tag时,默认为latest
. :是指定Dockerfile所在目录,如果就在当前目录,则指定为"."
示例:
[root@localhost ~]# mkdir app
[root@localhost ~]# cd app/
[root@localhost app]# ll   #需要上传以下文件
总用量 197880
-rw-r--r-- 1 root root  20131912 4月  25 08:54 app.jar
-rw-r--r-- 1 root root       497 4月  25 08:54 Dockerfile
-rw-r--r-- 1 root root 182487685 4月  25 08:54 jdk17.tar.gz
[root@localhost app]# docker build -t app:1.0 .
[+] Building 144.4s (11/11) FINISHED                        docker:default
 => [internal] load build definition from Dockerfile                  0.0s
 => => transferring dockerfile: 536B                                  0.0s
 => [internal] load metadata for docker.io/library/centos:7         115.5s
 => [internal] load .dockerignore                                     0.0s
 => => transferring context: 2B                                       0.0s
 => [1/6] FROM docker.io/library/centos:7@sha256:c2f1d5a9c0a81350fa  20.2s
 => => resolve docker.io/library/centos:7@sha256:c2f1d5a9c0a81350fa0  2.5s
 => => sha256:c2f1d5a9c0a81350fa0ad7e1eee99e379d75fe5382 529B / 529B  0.0s
 => => sha256:b5b4d78bc90ccd15806443fb881e35b5ddba92 2.79kB / 2.79kB  0.0s
 => => sha256:524b0c1e57f8ee5fee01a1decba2f301c324 75.88MB / 75.88MB  8.2s
 => => extracting sha256:524b0c1e57f8ee5fee01a1decba2f301c324a6513ca  9.2s
 => [internal] load build context                                     2.5s
 => => transferring context: 202.67MB                                 2.5s
 => [2/6] COPY jdk17.tar.gz /usr/local/                               0.9s
 => [3/6] RUN tar -xzf /usr/local/jdk17.tar.gz -C /usr/local/ &&  rm  5.1s
 => [4/6] RUN mkdir -p /app                                           0.4s
 => [5/6] WORKDIR /app                                                0.1s
 => [6/6] COPY app.jar app.jar                                        0.1s
 => exporting to image                                                1.9s
 => => exporting layers                                               1.9s
 => => writing image sha256:a311716f0c66fa71919eae5303bf745126fe46f1  0.0s
 => => naming to docker.io/library/app:1.0                            0.0s
[root@localhost app]# docker images
REPOSITORY   TAG       IMAGE ID       CREATED          SIZE
app          1.0       a311716f0c66   17 seconds ago   724MB
mysql        8         f5e6ba656d10   9 days ago       776MB
nginx        1.20.2    0584b370e957   2 years ago      141MB
redis        latest    e5e67996c442   10 years ago     419MB
[root@localhost app]# docker run -d --name myapp -p 8080:8080 app:1.0
9a034f44568276a25f1f8d32174f658712cb19d56bd33ba02631aaf75bfb86ec
[root@localhost app]#


#此时浏览器端访问192.168.111.128:8080/depts或emps  即可访问
4、网络
上节课我们创建了一个Java项目的容器,而Java项目往往需要访问其它各种中间件,例如MySQL、Redis等。现在,我们的容器之间能否互相访问呢?我们来测试一下
首先,我们查看下MySQL容器的详细信息,重点关注其中的网络IP地址:
[root@localhost app]# docker ps
CONTAINER ID   IMAGE          COMMAND                   CREATED         STATUS          PORTS                                                  NAMES
9a034f445682   app:1.0        "java -jar /app/app.…"   6 minutes ago   Up 6 minutes    0.0.0.0:8080->8080/tcp, :::8080->8080/tcp              myapp
9d4e3ddde927   mysql:8        "docker-entrypoint.s…"   12 hours ago    Up 41 minutes   33060/tcp, 0.0.0.0:3307->3306/tcp, :::3307->3306/tcp   mysql
772cf670ec06   nginx:1.20.2   "/docker-entrypoint.…"   16 hours ago    Up 41 minutes   0.0.0.0:80->80/tcp, :::80->80/tcp                      nginx
[root@localhost app]# docker inspect mysql | grep -iE 'ipaddress'
            "SecondaryIPAddresses": null,
            "IPAddress": "172.17.0.2",
                    "IPAddress": "172.17.0.2",
[root@localhost app]# docker inspect myapp | grep -iE 'ipaddress'
            "SecondaryIPAddresses": null,
            "IPAddress": "172.17.0.4",
                    "IPAddress": "172.17.0.4",

#可以发现mysql和myapp同处于一个网段172.17.0.0下


[root@localhost app]# docker exec -it myapp bash
[root@9a034f445682 app]# ls -l
total 19664
-rw-r--r-- 1 root root 20131912 Apr 25 00:54 app.jar
[root@9a034f445682 app]# ping 172.17.0.2
PING 172.17.0.2 (172.17.0.2) 56(84) bytes of data.
64 bytes from 172.17.0.2: icmp_seq=1 ttl=64 time=0.098 ms
64 bytes from 172.17.0.2: icmp_seq=2 ttl=64 time=0.175 ms
64 bytes from 172.17.0.2: icmp_seq=3 ttl=64 time=0.120 ms
^C
--- 172.17.0.2 ping statistics ---
3 packets transmitted, 3 received, 0% packet loss, time 2002ms
rtt min/avg/max/mdev = 0.098/0.131/0.175/0.032 ms
[root@9a034f445682 app]#


#结果发现可以互通
发现可以互联,没有问题。
但是,容器的网络IP其实是一个虚拟的IP,其值并不固定与某一个容器绑定,如果我们在开发时写死某个IP,而在部署时很可能MySQL容器的IP会发生变化,连接会失败。
常见命令有:
教学演示:自定义网络
# 1.首先通过命令创建一个网络
docker network create itheima

# 2.然后查看网络
docker network ls

# 结果:
NETWORK ID     NAME      DRIVER    SCOPE
639bc44d0a87   bridge    bridge    local
403f16ec62a2   itheima     bridge    local
0dc0f72a0fbb   host      host      local
cd8d3e8df47b   none      null      local
# 其中,除了itheima以外,其它都是默认的网络


# 3.让 myapp 和 mysql 都加入该网络
# 3.1.mysql容器,加入 itheima 网络
docker network connect itheima mysql

# 3.2.myapp容器,也就是我们的java项目, 加入 itheima 网络
docker network connect itheima myapp


# 4.1.进入容器
docker exec -it myapp bash

# 4.2.用容器名访问
ping mysql

# 结果:
PING mysql (172.18.0.2) 56(84) bytes of data.
64 bytes from mysql.itheima (172.18.0.2): icmp_seq=1 ttl=64 time=0.044 ms
64 bytes from mysql.itheima (172.18.0.2): icmp_seq=2 ttl=64 time=0.054 ms


#查看itheima网络详细信息
[root@localhost app]# docker network inspect itheima | grep -iE 'myapp|mysql' -n5
23-            "Network": ""
24-        },
25-        "ConfigOnly": false,
26-        "Containers": {
27-            "7b22297e2bce59f024538beed8b605529e3db77f83472fffcbd73712b3baa0c5": {
28:                "Name": "myapp",
29-                "EndpointID": "37e95218f68ff111eeda2159a061cd8834cc1ab270c8d846a0c872881dd38612",
30-                "MacAddress": "02:42:ac:12:00:03",
31-                "IPv4Address": "172.18.0.3/16",
32-                "IPv6Address": ""
33-            },
34-            "9d4e3ddde92759b760777248a59b0afc1566b659eecc3ed3f8107ca5d5dddf66": {
35:                "Name": "mysql",
36-                "EndpointID": "50a22c4c27b1939313bf567c7736bf6351b1a36726767cdd2a5765645940087d",
37-                "MacAddress": "02:42:ac:12:00:02",
38-                "IPv4Address": "172.18.0.2/16",
39-                "IPv6Address": ""
40-            }
[root@localhost app]#
OK,现在无需记住IP地址也可以实现容器互联了。
四、项目部署
1、部署服务器端
需求:将我们开发的 tlias-web-management 项目打包为镜像,并部署。
步骤:
修改项目的配置文件,修改数据库服务地址(打包package)。
编写Dockerfile文件(AI辅助)。
构建Docker镜像,部署Docker容器,运行测试。
修改项目的配置文件,修改数据库服务地址(打包package)。
DataGrip测试连接并导入数据库

编写Dockerfile文件
# 使用 CentOS 7 作为基础镜像
FROM centos:7

# 添加 JDK 到镜像中
COPY jdk17.tar.gz /usr/local/
RUN tar -xzf /usr/local/jdk17.tar.gz -C /usr/local/ &&  rm /usr/local/jdk17.tar.gz

# 设置环境变量
ENV JAVA_HOME=/usr/local/jdk-17.0.10
ENV PATH=$JAVA_HOME/bin:$PATH

# 阿里云OSS环境变量
ENV OSS_ACCESS_KEY_ID=LTAI5tDqTpEYcULzryPRc8hU
ENV OSS_ACCESS_KEY_SECRET=Bike0vjcmeq6mhdSGF4zA3pODzPzv3

#统一编码
ENV LANG=en_US.UTF-8
ENV LANGUAGE=en_US:en
ENV LC_ALL=en_US.UTF-8

# 创建应用目录
RUN mkdir -p /tlias
WORKDIR /tlias

# 复制应用 JAR 文件到容器
COPY  tlias.jar  tlias.jar

# 暴露端口
EXPOSE 8080

# 运行命令
ENTRYPOINT ["java","-jar","/tlias/tlias.jar"]
由于项目要运行,需要依赖jdk的环境,所以这里我们需要将tlias.jar,jdk17.tar.gz,Dockerfile三个文件,上传到Linux服务器的 /root/tlias 目录下(如果没有这个目录,提前创建好)。
[root@localhost ~]# mkdir /root/tlias
[root@localhost ~]# cd /root/tlias/
[root@localhost tlias]# ll    #将文件上传至tlias下
总用量 212808
-rw-r--r-- 1 root root       705 4月  25 11:08 Dockerfile
-rw-r--r-- 1 root root 182487685 4月  25 11:08 jdk17.tar.gz
-rw-r--r-- 1 root root  35421625 4月  25 11:08 tlias.jar
[root@localhost tlias]#


#构建镜像
[root@localhost tlias]# docker build -t tlias:1.0 .
[root@localhost tlias]# docker images
REPOSITORY   TAG       IMAGE ID       CREATED          SIZE
tlias        1.0       db8ba39d0e42   14 seconds ago   739MB
app          1.0       a311716f0c66   2 hours ago      724MB
mysql        8         f5e6ba656d10   9 days ago       776MB
nginx        1.20.2    0584b370e957   2 years ago      141MB
redis        latest    e5e67996c442   10 years ago     419MB
[root@localhost tlias]#


#部署docker容器
[root@localhost tlias]# docker run -d --name tlias-server --network itheima -p 8080:8080  tlias:1.0
56c5a99eddb89b24ae1c063a3defeb61923eb09466c2b29b6343f2db48507d9f
[root@localhost tlias]# docker ps
CONTAINER ID   IMAGE       COMMAND                   CREATED          STATUS          PORTS                                                  NAMES
56c5a99eddb8   tlias:1.0   "java -jar /tlias/tl…"   5 seconds ago    Up 3 seconds    0.0.0.0:8080->8080/tcp, :::8080->8080/tcp              tlias-server
339c47ec0f55   mysql:8     "docker-entrypoint.s…"   20 minutes ago   Up 20 minutes   33060/tcp, 0.0.0.0:3307->3306/tcp, :::3307->3306/tcp   mysql
[root@localhost tlias]#


#查看容器的运行日志
[root@localhost tlias]# docker logs -f tlias-server

  .   ____          _            __ _ _
 /\\ / ___'_ __ _ _(_)_ __  __ _ \ \ \ \
( ( )\___ | '_ | '_| | '_ \/ _` | \ \ \ \
 \\/  ___)| |_)| | | | | || (_| |  ) ) ) )
  '  |____| .__|_| |_|_| |_\__, | / / / /
 =========|_|==============|___/=/_/_/_/

 :: Spring Boot ::                (v3.4.3)

2025-04-25 03:21:10.553 [main] INFO  org.example.TliasWebManagementApplication - Starting TliasWebManagementApplication v0.0.1-SNAPSHOT using Java 17.0.10 with PID 1 (/tlias/tlias.jar started by root in /tlias)
2025-04-25 03:21:10.571 [main] INFO  org.example.TliasWebManagementApplication - No active profile set, falling back to 1 default profile: "default"
2025-04-25 03:21:14.501 [main] INFO  o.s.boot.web.embedded.tomcat.TomcatWebServer - Tomcat initialized with port 8080 (http)
2025-04-25 03:21:14.527 [main] INFO  org.apache.coyote.http11.Http11NioProtocol - Initializing ProtocolHandler ["http-nio-8080"]
2025-04-25 03:21:14.535 [main] INFO  org.apache.catalina.core.StandardService - Starting service [Tomcat]
2025-04-25 03:21:14.536 [main] INFO  org.apache.catalina.core.StandardEngine - Starting Servlet engine: [Apache Tomcat/10.1.36]
2025-04-25 03:21:14.661 [main] INFO  o.a.c.core.ContainerBase.[Tomcat].[localhost].[/] - Initializing Spring embedded WebApplicationContext
2025-04-25 03:21:14.664 [main] INFO  o.s.b.w.s.c.ServletWebServerApplicationContext - Root WebApplicationContext: initialization completed in 3843 ms
Logging initialized using 'class org.apache.ibatis.logging.stdout.StdOutImpl' adapter.


,------.                           ,--.  ,--.         ,--.
|  .--. '  ,--,--.  ,---.   ,---.  |  '--'  |  ,---.  |  |  ,---.   ,---.  ,--.--.
|  '--' | ' ,-.  | | .-. | | .-. : |  .--.  | | .-. : |  | | .-. | | .-. : |  .--'
|  | --'  \ '-'  | ' '-' ' \   --. |  |  |  | \   --. |  | | '-' ' \   --. |  |
`--'       `--`--' .`-  /   `----' `--'  `--'  `----' `--' |  |-'   `----' `--'
                   `---'                                   `--'                        is intercepting.

2025-04-25 03:21:17.497 [main] INFO  org.apache.coyote.http11.Http11NioProtocol - Starting ProtocolHandler ["http-nio-8080"]
2025-04-25 03:21:17.533 [main] INFO  o.s.boot.web.embedded.tomcat.TomcatWebServer - Tomcat started on port 8080 (http) with context path '/'
2025-04-25 03:21:17.566 [main] INFO  org.example.TliasWebManagementApplication - Started TliasWebManagementApplication in 8.467 seconds (process running for 10.184)
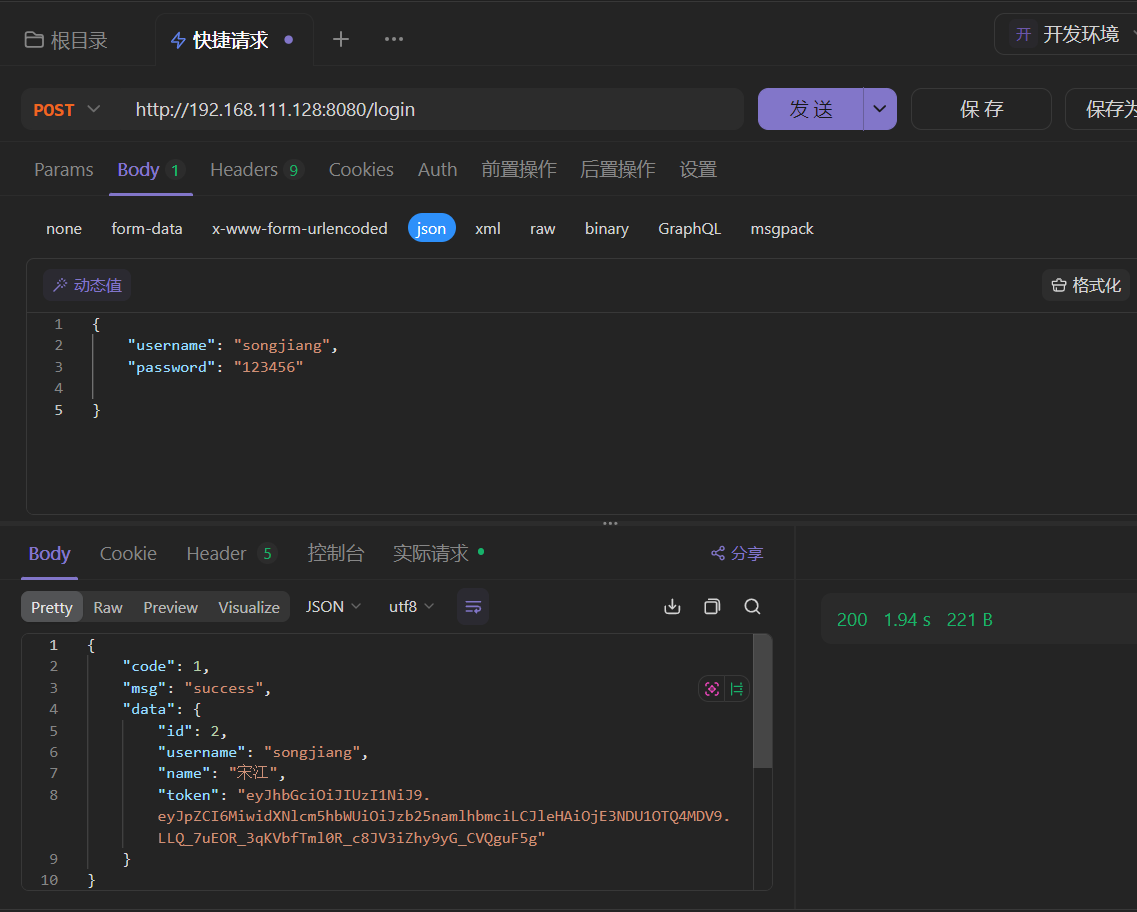
apifox测试成功
2、部署前端
[root@localhost ~]# mkdir /usr/local/docker-nginx
[root@localhost ~]# cd /usr/local/docker-nginx/
[root@localhost docker-nginx]# ll
总用量 0
drwxr-xr-x 2 root root 24 4月 25 11:44 conf
drwxr-xr-x 2 root root 43 4月 25 11:44 html
[root@localhost docker-nginx]# cat conf/nginx.conf
#user nobody;
worker_processes 1;
events {
worker_connections 1024;
}
http {
include mime.types;
default_type application/octet-stream;
sendfile on;
keepalive_timeout 65;
server {
listen 80;
server_name localhost;
client_max_body_size 10m;
location / {
root /usr/share/nginx/html; #此处为docker容器中的nginx目录
index index.html index.htm;
try_files $uri $uri/ /index.html;
}
location ^~ /api/ {
rewrite ^/api/(.*)$ /$1 break;
proxy_pass http://tlias-server:8080; #此处为docker后端的容器名
}
}
}
[root@localhost docker-nginx]#
#启动容器
docker run -d \
--name nginx-tlias \
-v /usr/local/docker-nginx/html:/usr/share/nginx/html \
-v /usr/local/docker-nginx/conf/nginx.conf:/etc/nginx/nginx.conf \
--network itheima \
-p 80:80 \
nginx:1.20.2
#查看容器
[root@localhost docker-nginx]# docker ps
CONTAINER ID IMAGE COMMAND CREATED STATUS PORTS NAMES
16d3d4d204d5 nginx:1.20.2 "/docker-entrypoint.…" 7 seconds ago Up 6 seconds 0.0.0.0:80->80/tcp, :::80->80/tcp nginx-tlias
56c5a99eddb8 tlias:1.0 "java -jar /tlias/tl…" 28 minutes ago Up 28 minutes 0.0.0.0:8080->8080/tcp, :::8080->8080/tcp tlias-server
339c47ec0f55 mysql:8 "docker-entrypoint.s…" 49 minutes ago Up 49 minutes 33060/tcp, 0.0.0.0:3307->3306/tcp, :::3307->3306/tcp mysql
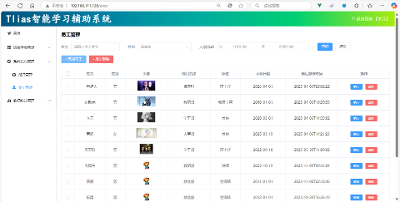
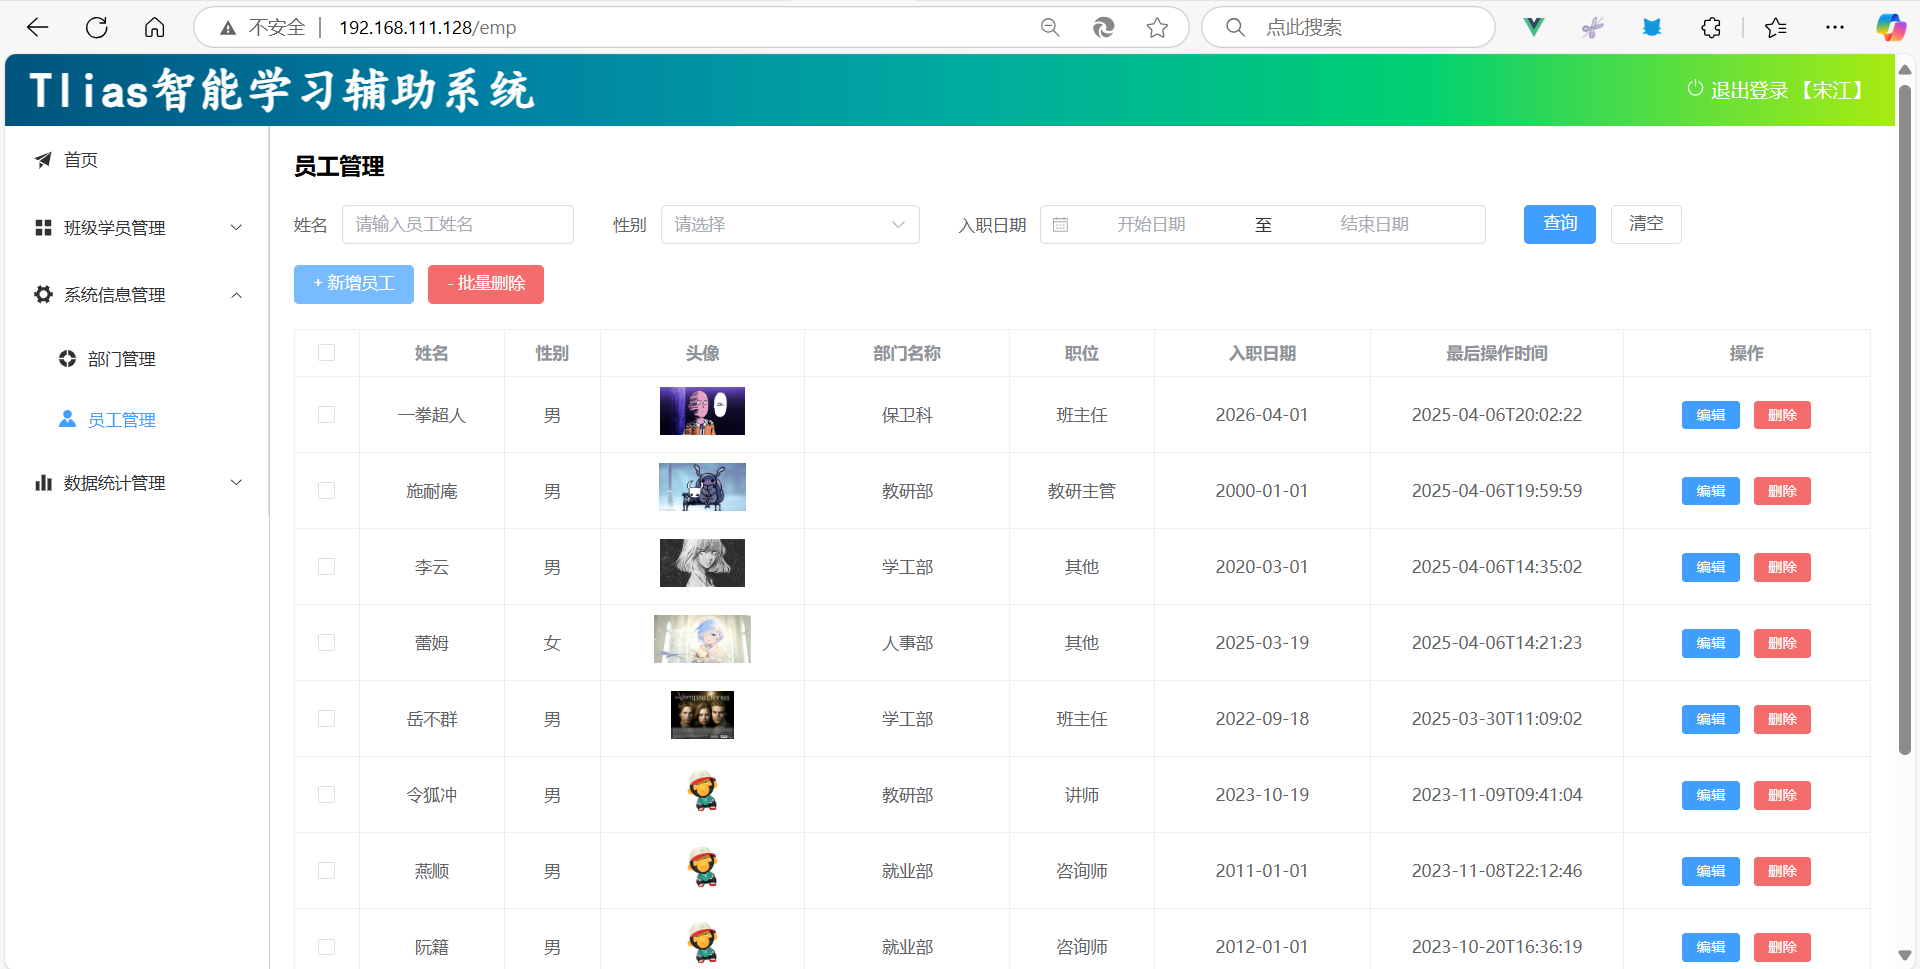
[root@localhost docker-nginx]# 测试访问nginx服务器
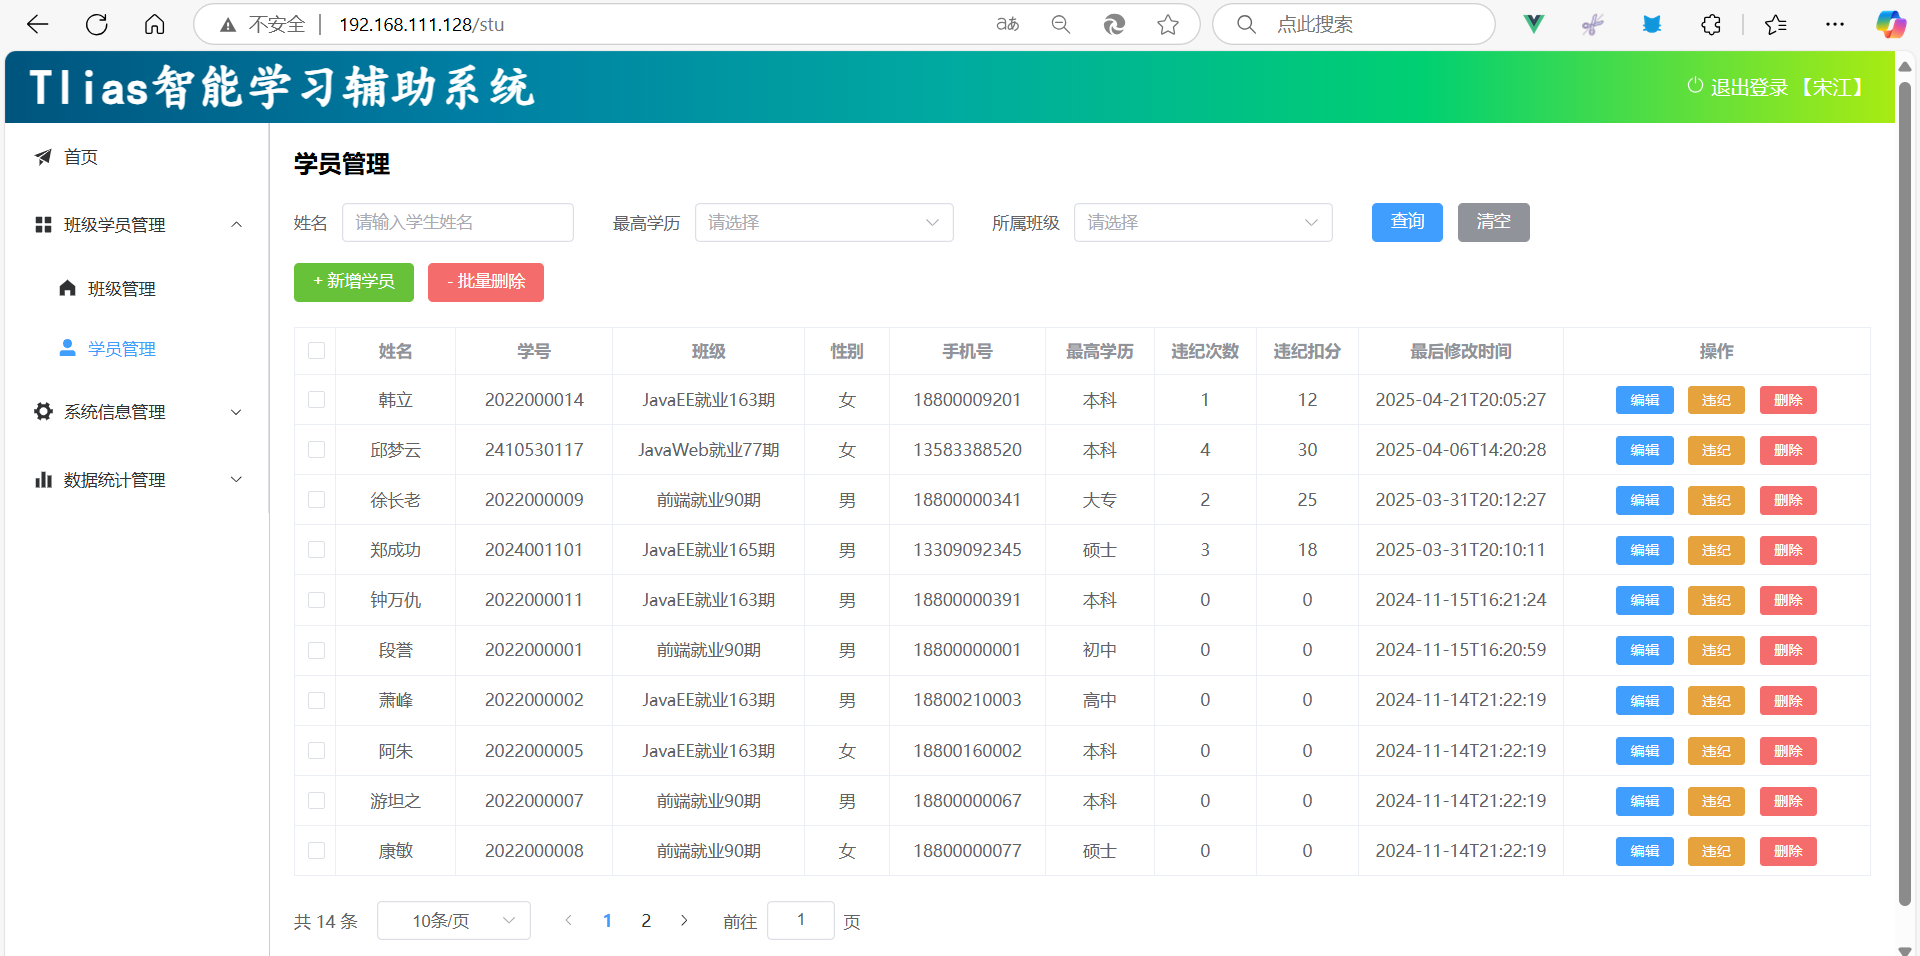
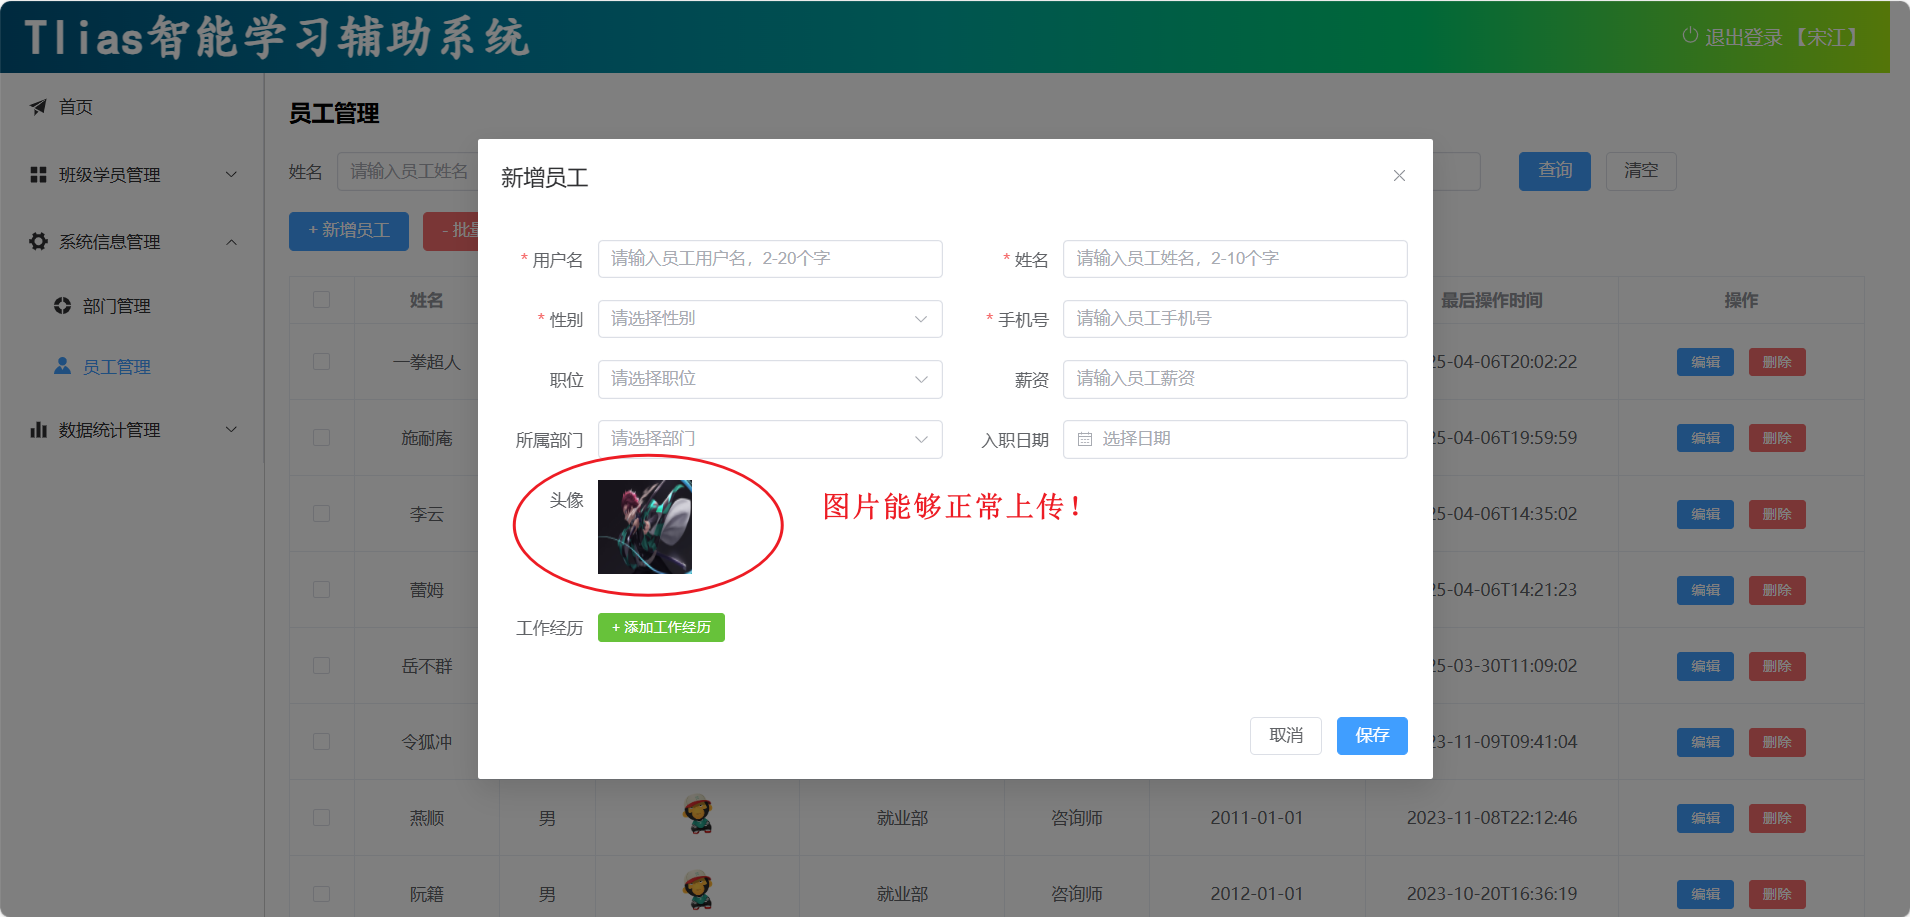
测试文件上传功能
3、DockerCompose
大家可以看到,我们部署一个简单的java项目,其中包含3个容器:
MySQL
Nginx
Java项目
而稍微复杂的项目,其中还会有各种各样的其它中间件,需要部署的东西远不止3个。如果还像之前那样手动的逐一部署,就太麻烦了。
而Docker Compose就可以帮助我们实现多个相互关联的Docker容器的快速部署。它允许用户通过一个单独的 docker-compose.yml 模板文件(YAML 格式)来定义一组相关联的应用容器。
3.1 基本语法
docker-compose文件中可以定义多个相互关联的应用容器,每一个应用容器被称为一个服务(service)。由于service就是在定义某个应用的运行时参数,因此与docker run参数非常相似。
举例来说,用docker run部署MySQL的命令如下:
docker run -d \
--name nginx-tlias \
-p 80:80 \
-v /usr/local/tlias-app/nginx/html:/usr/share/nginx/html \
-v /usr/local/tlias-app/nginx/conf/nginx.conf:/etc/nginx/nginx.conf \
--network itheima \
nginx:1.20.2如果用docker-compose.yml文件来定义,就是这样:
services:
  mysql:
    image: "nginx:1.20.2"
    container_name: nginx-tlias
    ports:
      - "80:80"
    volumes:
      - "/usr/local/tlias-app/nginx/html:/usr/share/nginx/html"
      - "/usr/local/tlias-app/nginx/conf/nginx.conf:/etc/nginx/nginx.conf"
    networks:
      - itheima
networks:
  itheima:
    name: itheima
对比如下:
明白了其中的对应关系,相信编写docker-compose文件应该难不倒大家。
services:
  mysql:
    image: mysql:8
    container_name: mysql
    ports:
      - "3307:3306"
    environment:
      TZ: Asia/Shanghai
      MYSQL_ROOT_PASSWORD: 123456
    volumes:
      - "/usr/local/app/mysql/conf:/etc/mysql/conf.d"
      - "/usr/local/app/mysql/data:/var/lib/mysql"
      - "/usr/local/app/mysql/init:/docker-entrypoint-initdb.d"
    networks:
      - tlias-net
  tlias:
    build:
      context: .
      dockerfile: Dockerfile
    container_name: tlias-server
    ports:
      - "8080:8080"
    networks:
      - tlias-net
    depends_on:
      - mysql
  nginx:
    image: nginx:1.20.2
    container_name: nginx
    ports:
      - "80:80"
    volumes:
      - "/usr/local/app/nginx/conf/nginx.conf:/etc/nginx/nginx.conf"
      - "/usr/local/app/nginx/html:/usr/share/nginx/html"
    depends_on:
      - tlias
    networks:
      - tlias-net
networks:
  tlias-net:
    name: itheima
3.2 基础命令
编写好docker-compose.yml文件,就可以部署项目了。语法如下:
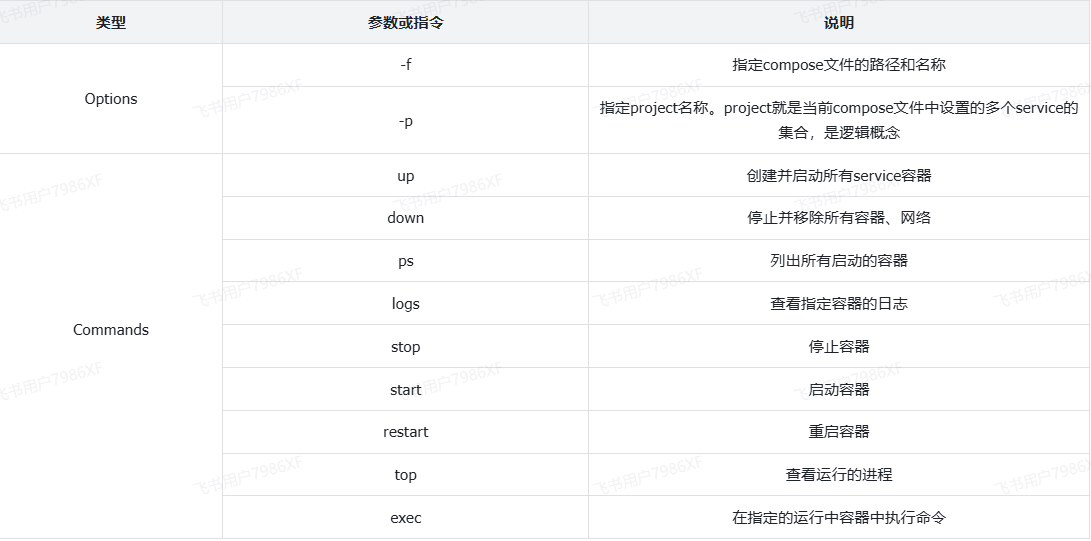
docker compose [OPTIONS] [COMMAND]其中,OPTIONS和COMMAND都是可选参数,比较常见的有:
3.3 操作演示
部署DockerCompose
#创建app目录,上传资源
[root@localhost local]# cd /usr/local/app/
[root@localhost app]# ll
总用量 212812
-rw-r--r-- 1 root root       948 4月  25 16:06 docker-compose.yml
-rw-r--r-- 1 root root       705 4月  25 16:06 Dockerfile
-rw-r--r-- 1 root root 182487685 4月  25 16:06 jdk17.tar.gz
drwxr-xr-x 5 root root        42 4月  25 16:06 mysql
drwxr-xr-x 4 root root        30 4月  25 16:06 nginx
-rw-r--r-- 1 root root  35421625 4月  25 16:06 tlias.jar
[root@localhost app]# ll mysql/
总用量 0
drwxr-xr-x 2 root root  6 4月  25 16:06 conf
drwxr-xr-x 2 root root  6 4月  25 16:06 data
drwxr-xr-x 2 root root 53 4月  25 16:06 init
[root@localhost app]# ll nginx/
总用量 0
drwxr-xr-x 2 root root 24 4月  25 16:06 conf
drwxr-xr-x 3 root root 57 4月  25 16:06 html
[root@localhost app]#


#启动DockerCompose
[root@localhost app]# docker compose up -d
[+] Building 9.9s (11/11) FINISHED                          docker:default
 => [tlias internal] load build definition from Dockerfile            0.0s
 => => transferring dockerfile: 744B                                  0.0s
 => [tlias internal] load metadata for docker.io/library/centos:7     6.0s
 => [tlias internal] load .dockerignore                               0.0s
 => => transferring context: 2B                                       0.0s
 => [tlias 1/6] FROM docker.io/library/centos:7@sha256:c2f1d5a9c0a81  0.0s
 => [tlias internal] load build context                               3.0s
 => => transferring context: 217.95MB                                 3.0s
 => CACHED [tlias 2/6] COPY jdk17.tar.gz /usr/local/                  0.0s
 => CACHED [tlias 3/6] RUN tar -xzf /usr/local/jdk17.tar.gz -C /usr/  0.0s
 => [tlias 4/6] RUN mkdir -p /tlias                                   0.6s
 => [tlias 5/6] WORKDIR /tlias                                        0.0s
 => [tlias 6/6] COPY  tlias.jar  tlias.jar                            0.1s
 => [tlias] exporting to image                                        0.1s
 => => exporting layers                                               0.1s
 => => writing image sha256:79fdc18dd88761c0a67887c334cb2b9f3cf32d00  0.0s
 => => naming to docker.io/library/app-tlias                          0.0s
[+] Running 4/4
 ✔ Network itheima         Created                                    0.4s
 ✔ Container mysql         Started                                    0.4s
 ✔ Container tlias-server  Started                                    0.8s
 ✔ Container nginx-tlias   Started                                    1.5s
[root@localhost mysql]# docker ps
CONTAINER ID   IMAGE          COMMAND                   CREATED              STATUS              PORTS                                                  NAMES
23fd7f66f27e   nginx:1.20.2   "/docker-entrypoint.…"   About a minute ago   Up About a minute   0.0.0.0:80->80/tcp, :::80->80/tcp                      nginx-tlias
5ccffa14b94a   app-tlias      "java -jar /tlias/tl…"   About a minute ago   Up About a minute   0.0.0.0:8080->8080/tcp, :::8080->8080/tcp              tlias-server
c3e1e06f63ad   mysql:8        "docker-entrypoint.s…"   About a minute ago   Up About a minute   33060/tcp, 0.0.0.0:3307->3306/tcp, :::3307->3306/tcp   mysql
[root@localhost mysql]#
浏览器访问测试

文件上传成功
停止移除所有容器和网络
[root@localhost app]# docker ps
CONTAINER ID   IMAGE          COMMAND                   CREATED         STATUS         PORTS                                                  NAMES
23fd7f66f27e   nginx:1.20.2   "/docker-entrypoint.…"   7 minutes ago   Up 7 minutes   0.0.0.0:80->80/tcp, :::80->80/tcp                      nginx-tlias
5ccffa14b94a   app-tlias      "java -jar /tlias/tl…"   7 minutes ago   Up 7 minutes   0.0.0.0:8080->8080/tcp, :::8080->8080/tcp              tlias-server
c3e1e06f63ad   mysql:8        "docker-entrypoint.s…"   7 minutes ago   Up 7 minutes   33060/tcp, 0.0.0.0:3307->3306/tcp, :::3307->3306/tcp   mysql


#停止移除所有容器和网络
[root@localhost app]# docker compose down
[+] Running 4/4
 ✔ Container nginx-tlias   Removed                                                                                                        0.2s
 ✔ Container tlias-server  Removed                                                                                                        0.4s
 ✔ Container mysql         Removed                                                                                                        3.0s
 ✔ Network itheima         Removed                                                                                                        0.2s
[root@localhost app]# docker ps
CONTAINER ID   IMAGE     COMMAND   CREATED   STATUS    PORTS     NAMES
[root@localhost app]# docker network ls
NETWORK ID     NAME      DRIVER    SCOPE
8c34b8f5f82e   bridge    bridge    local
cc3ec0a9773f   host      host      local
bab53eb50940   none      null      local
[root@localhost app]#


#------------------------------JavaWeb完结撒花✿✿ヽ(°▽°)ノ✿------------------------------

#至此javaweb的学习就到此为止了
#特别感谢阿玮和涛哥两位老师的悉心教导!!!
#在此后的java学习和工作生涯中, 我愿带着老师传授的工程思维与代码匠心,在0与1的世界里走出属于自己的技术栈
#代码会记得初心,服务器永不宕机!